
7 Tips for Better Accuracy
Advanced archers make shooting look effortless, but it’s only because they’ve put in countless hours mastering the basics. Over time the many components of form become one single subconscious step that happens in the background of the mind. Here are some key tips for improving your shot.
#1: Keep both eyes open
Keeping both eyes open gives you a better sight picture. This is especially important with traditional bows. Because there aren’t any sights on a traditional bow, your focus is on the target. To acquire a more accurate target, keep both eyes open. I still do this with the compound bow, especially if I’m unsure of the distance.
Keeping both eyes open gives me more dimensionality to the target. Everything I do all day requires me to keep both eyes open, so why would I close one when shooting?

If you close one eye, you are viewing the world in 2D, not 3D. This is not how your brain sees the world. Because I don’t view the world in two dimensions, I don’t aim in two dimensions either.
#2: Don’t Aim
Proper form begins from the ground up: feet placement, proper grip, and drawing the string to your anchor point. It ends with aiming, releasing, and following through. Of all these steps, aiming is really the easiest and least important.
In traditional archery, aiming is accomplished by simply pointing the arrow at the target. In the time it takes to master the other fundamentals, aiming will become “instinctive.” Therefore, your focus should be on consistent form and follow through, not aiming. If your form is correct, the arrow will find the bull’s-eye on its own.
Note: Correct aiming happens by aligning the string with your eye. This is done by touching the string to the side or tip of your nose. I won’t even loose the arrow until I feel the string on my nose.
#3: Touch your ear
What does your ear have to do with shooting? After each shot, your release hand should brush past your face and end up touching your ear. If you make this a habit, I guarantee your accuracy will improve.
Follow-through means your release hand continues back as your bow arm goes forward. If you allow your release hand to move forward on the shot, or up or down, then the string will be pulled–or plucked–out of alignment, causing the arrow to wobble or drift side to side.
The best way to avoid errant arrows is to follow through straight back. Touching your ear means you’ve released correctly.

#4: Don’t flinch
Where the bow goes, the arrow goes.
Flinching is a major no-no. The two biggest indicators of flinching are a) dropping or raising your bow arm at the shot, or b) lifting your head to see where the arrow hits.
Neither your head nor your bow arm should move until the arrow hits the target. It’s normal for the bow to rock forward or back on release, but your bow arm should remain up and pointed at the target until the arrow hits. Your head—which is slightly cocked to the side—should also remain in frozen in position as well.
The best way to avoid flinching is to have a surprise release. A common mistake is anticipating the shot by focusing on the release rather than follow-through.
Instead, all your focus should be on form. As you reach your anchor point, the arrow and string will simply pull free as you relax your release hand. If you concentrate the release hand, the string will jerk out of your hand causing the arrow to miss.
#5: Use your back
All the power to draw the bow comes from your back muscles, not your arms. I refer to the arms as “deadposts” or “anchors” because they simply serve to hold the bow. The real power comes from your back muscles.
Your back is much stronger than your arms, and that power is transferred to the bow through your arms. Think of you arms as electric power lines which hang loosely in the air. The lines don’t create the tremendous power that surges through them, the power plant does.
The best way to tap into your back power is to stand up straight and squeeze your shoulder blades together. Upon release, your shoulder blades will continue pulling together—almost touching—while your arms pull the bow apart in opposite directions.
Harnessing the power of your back is the only way to load the bow with enough power to execute the shot properly.
#6: Don’t pinch the string
The most common problem I see in beginner archery is simply keeping the arrow from falling off the bow. At least half my beginner students have a hard time keeping the arrow on the bow long enough to shoot. This is caused by pinching the nock.

The string is gripped with three fingers: index, middle, and ring. As you draw the bow back, the fingers tend to bunch up and put pressure on the nock, which ends up pulling the arrow off the shelf.
To keep this from happening, simply leave a slight gap between your fingers as you draw. If the problem persists, try tilting the bow farther to the side and letting gravity hold the arrow for you.
As frustrating as this might be, the problem usually fixes itself over time.
#7: Loosen your grip on the bow
Frequent left and right misses are caused by torquing, or over-gripping, the bow. I call it the “death grip.” People death-grip the bow because they feel like they need to control the tremendous energy they’ve loaded into to the bow at full draw.
Heavy bows have so much power that we think they might fly back into our face if we don’t grip them tightly. In reality, all that energy simply leaves with the arrow and the bow falls limp in your hand. If you grip too tight, you’ll force the bow left or right. Remember, where the bow goes, the arrow goes.
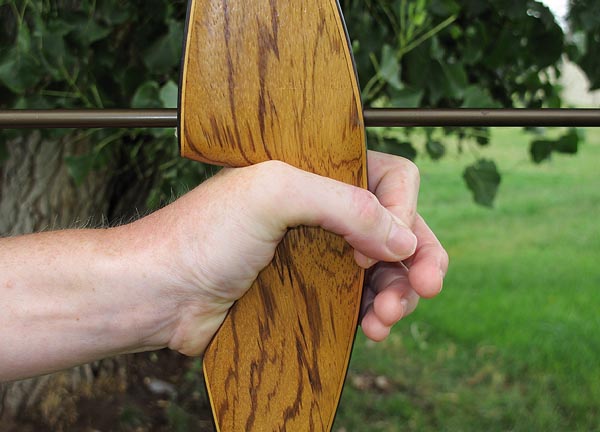
To avoid torque, simply allow the bow sit loosely in your palm while resting your fingertips lightly on the front of the grip. This allows the bow to settle into its natural alignment.
The best way I’ve found to avoid over-gripping the bow is to simply touch your thumb and index finger together and let your other fingers float in front of the bow (see photo).
Conclusion
With enough practice, anyone can master the art of archery. Just remember that hitting the bulls-eye is a long-term goal. Your short-term goal should to master the basic fundamentals. I promise you, hitting the bullseye will come naturally given enough time.
Enjoy the process and don’t get discouraged. If you have any questions at all, please leave a comment.
Happy Shooting!
excelente las explicaciones y sobretodo muy claro
Very good tips