Occasionally I have a beginner student consistently missing wide of the bullseye. At first it appears they’re doing everything correctly, however it quickly becomes apparent that the person is aiming with the wrong eye. Even after pointing this out, he keeps shooting with the wrong eye, or the eye that’s farthest from the arrow.
Knowing which of eye is dominant is imperative to accuracy in archery. If you try aiming with your the wrong eye, the target won’t be in the right place.
When I first hand out bows, I hand them out according to a person’s dominant hand (left or right-handedness). But some people have an opposite eye dominance. They write and throw a ball with their right hand, but they are left-eye dominant. How do you correct for this? Is it better to shoot a left-handed bow?
The answer is NO.
No matter which eye is dominant, you should still shoot with your dominant hand. Your dominant hand is your release hand, or the one that controls the arrow, string, and the final release. This means that you’ll shoot more accurately and naturally using your dominant hand.
Fortunately you can easily train yourself to aim and shoot with your non-dominant eye.
The Fix
One fix is to simply close your non-shooting eye. This will immediately force you to aim with the correct eye. However, shooting with one eye closed is not recommended. Keeping both eyes open gives you a better sight picture and allows you to see depth and distance more accurately.
Eye patch method for fixing eye-dominance problems in archery.
A better method is to wear an eye patch (temporarily) over your non-shooting eye. Yes, you will look like an archery pirate for a while, but in a short amount of time you’ll train yourself to shoot with the eye that matches your shooting hand.
What is Eye Dominance?
Your dominant eye is the one that sends the most information to your brain. It tends to be the eye that gets the most use. Some people have one eye that is much more dominant than the other, while others have an eye that is only slightly more dominant. You can find out which of your eyes is the dominant one using a simple at-home test.
Testing for Eye Dominance
The Miles Test, described below, is considered to be a good indicator of eye dominance:
Extend your arms in front of you with your palms facing away.
Bring your hands together, forming a small hole by crossing the thumbs and forefingers.
Choose a small object about 15-20 feet away from you. With both eyes open, focus on the object as you look through the small hole.
Close one eye and then the other. When you close one eye, the object will be stationary. When you close the other eye, the object should disappear from the hole or jump to one side.
If the object does not move when you cover one eye, then that eye is dominant. The eye that sees the object and does not move is the dominant eye.
Determine eye dominance using the test mentioned above.
Final Thoughts
Although it is possible for a right-handed person to learn how to shoot a left-handed bow, it is much more natural (and more accurate) to learn to shoot with your non-dominant eye. If you are wondering where to get an eye patch, just look to your local pharmacy.
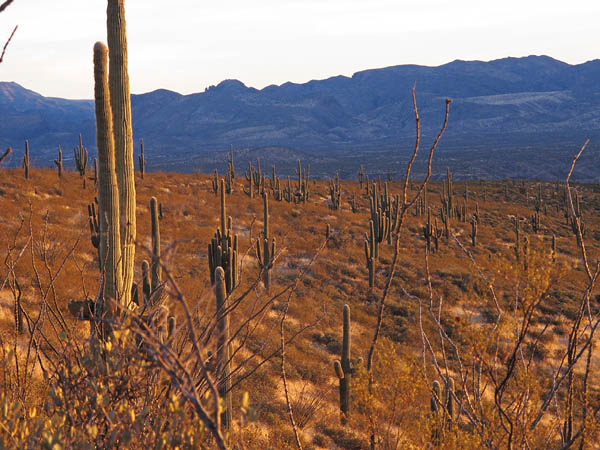
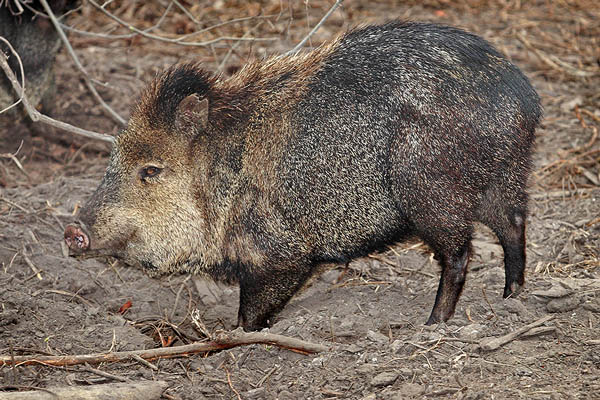
A long, cold winter can be a dreary time for a committed bowhunter. But it needs not be. Lurking around the cactus and brush of the American Southwest desert is a fascinating creature that many people have never seen before. This coarse-haired, pig-like creature is the collared peccary, more commonly known as a javelina.
He stands about two feet tall and three feet long, and weighs between 30 and 60 pounds. He’s a clever, secretive creature that offers a fun and exciting challenge to any bowhunter.
The javelina is common enough in places like Arizona to procure a tag at least every other year. Best of all, most javelina hunts occur in the dead of winter, making it an ideal wintertime activity.
When and Where
Javelina are found sparsely over desert landscapes varying from 2000 to 5000 feet in elevation. It can take a while to locate them these small animals in the vast desert, so be sure you allow enough time to get the job done. I wouldn’t consider a hunt less than five days long.
Typical javelina country at 2500′.
For the novice javelina hunter, the near-sighted, unassuming javelina can be deceptively difficult to hunt. Like other “big” game animals, javelina are highly skilled at evading predators. Bowhunting success hovers around 25%, so it’s crucial to learn all you can before heading to the desert.
General Info
Javelina rely on their noses, ears and eyes to detect danger. Although javelina have relatively poor eyesight, they are still adept at picking up movement, especially within bow range. Their sense of hearing is very good, but their sense of smell is excellent, so always approach from downwind.
Javelina are territorial animals with home ranges averaging one square mile, but this can vary widely from place to place. Javelina travel in herds commonly between 8 and 10, but sometimes more.
Rarely will you find a lone pig. If you do, be on the lookout for others that could ruin your stalk. Occasionally you’ll find small bachelor groups of two or three animals traveling apart from the main group.
Habitat
Like many other prey species, javelina are most active in the morning and evening. In winter when days are cold and short, javelina spend more time up and feeding. It’s not uncommon to find javelina feeding or traveling as late as 11 a.m. In the evening they tend to unbed an hour or two before dark, so morning is your best bet.
Dug out bed and scattered droppings.
Javelina bed down together in large, dug-out beds beneath mesquite trees or rock outcroppings. Beds usually have piles of scat scattered around the outside. The freshness of the scat will tell you whether you’ve found an active bed or not.
Javelina droppings are easy to identify, like that of a large dog. Interestingly, javelina have the runs much of the time, so keep an eye out for that too.
Food and Water
Although javelina are classified as omnivores, they’re mostly herbivores, and their favorite food is cactus. Although they eat a variety of cactus species, their favorite is the prickly pear cactus.
Begin by locating areas with high concentrations of prickly pear. Look for cactus that has been torn apart, scattered around, and chewed up. From there, continue your search into brushy draws, washes, and river bottoms.
Prickly pear cactus torn up and eaten by javelina.
Despite the arid environment in which they live, javelina don’t visit water regularly. Instead, they get most of their moisture from cactus and other plants they eat.
Scouting & E-Scouting
Before heading to the desert for the first time, make sure you do a little research. Start by contacting the biologist over the unit to get some good starting points.
Next, check the state’s fish and game website for more information. Arizona’s hunting website has a “Where to Hunt” page with a helpful overview of each unit, including access points and biologist notes (www.azgfd.com/hunting/units/). When hunting a new location, try to arrive a day or two early for scouting and glassing.
Spot & Stalk Tactics
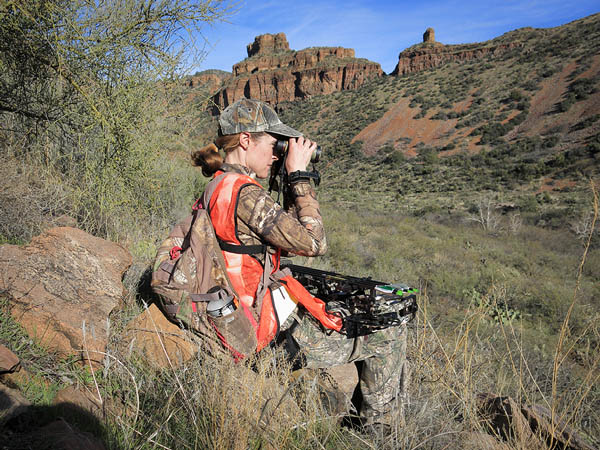
Glassing south and southeast facing slopes early in the morning is the best strategy for locating javelina. Because they don’t have under-fur, javelina use the sun to warm up after a cold night. As the day begins to warm, glassing becomes less effective as the pigs head for cover and shade.
Esther glasses the brushy bottoms with binoculars.
Javelina are small animals that blend well with their habitat. A high-powered spotting scope on a tripod is far better than handheld binoculars. Always start your glassing from the highest vantage possible. Begin by glassing areas with plenty of cactus, and look for open hillsides above brushy draws or river bottoms. Javelina are mostly lowlanders and don’t spend a lot of time in steep country.
Once you’ve located a herd, plan your stalk based on two things: wind direction and the general direction the herd is headed. If it’s still early, the javelina will likely stay put, so you can take it slow and quiet. Later in the morning the herd is more likely to move during your stalk, so pick up the pace.
Sign and Tracking
The next step is to locate tracks, trails, beds and droppings. Javelina are creatures of habit and use traditional routes throughout their range. Locating trails is key to finding them. Trails rarely lead through the wide open, so begin your search in the brushy bottoms. On one occasion I unknowingly set my camp right next to a trail. Twice my wife watched javelina walk right through camp while I was out looking for them.
Javelina group tracks through desert.
Tracking is a great way to learn about javelina, like what they eat and where they sleep. Boars have larger, rounder tracks while juveniles and females have smaller, pointier tracks. If all the tracks you find are medium-sized with tiny tracks mixed in, then it’s likely a female and baby group.
Tracking is difficult in sandy or gravelly soil because it doesn’t hold detail well. But you can still determine the direction of travel by following the deeper, toe-end of the track which points forward.
When the track eventually runs into mud or hard dirt, you can make more determinations about the animals you’re following. Fortunately javelina travel in groups which makes tracking easier.
If you bust a group of javelina out of an area, there’s a good chance they’ll return after a day or two. In the meantime, keep moving. Javelina leave sign wherever they go. Watch for torn up cactus, beds and fresh scat piles. If the torn-up cactus is still bright green and wet, the javelina should be nearby. They also do a lot of rooting and digging, so keep an eye out for torn up ground.
Still-Hunting Tactics
During the day javelina can be found by still-hunting near bedding areas, especially around larger mesquite trees. Javelina have scent glands on their rumps which they rub on trees and rocks to mark their territory. When still-hunting it’s not uncommon to pick up their musky odor long before you see them. Just another reason to hunt with the wind in your face.
In areas with moderate to high hunting pressure, glassing can become futile. Once the animals are driven into heavy cover, you may never see them again. In the unit where I hunt, I’ve actually never seen a javelina while glassing. The animals always stay in thick cover and brushy bottoms, which makes still-hunting the best method for finding them. You just have to cover a lot of ground and follow tracks.
Ambush Tactics
Esther took this fine javelina as it traveled towards bedding area.
Ambushing heavily used trails, pinch-points, and active bedding sites is viable option. I’ve had best luck ambushing routes between 10 and 11 a.m. when javelina are moving to bed. The javelina’s poor eyesight allows you to set up closer than you might for deer or elk.
Sitting in a ground blind near a water hole can also be effective, but only on dry years. Although they get most of their water from plants, javelina will still visit water, especially if it’s unseasonably hot and dry.
Vocalization and Calling
Although there are some javelina calls on the market, I’ve found them to be marginally effective. I read once that javelina will come to a dying rabbit call, but in practice the javelina just got nervous and moved off.
It really depends on how much hunting pressure they’ve had. Javelina are curious by nature, but when pressured they tend to shy away from foreign sounds.
Otherwise, javelina are quite vocal. When traveling or feeding in heavy brush, javelina make continuous “woof” sound to keep tabs on each other. In the thick stuff you’re more likely to hear them before you see them.
If you spook a javelina but he doesn’t run, “woofing” may calm him down long enough for a shot. In some cases you can even use woofing to get them to step out from behind cover.
Once bedded, javelina are mostly silent. Occasionally herd members will get into fights and make loud snarls and clacking sounds with their teeth, so keep your ears open.
Shot Execution
The bow and arrow set up you use for deer should work fine for javelina, just be sure to know your effective range beforehand. Javelina have a small kill zone of about 6 inches diameter.
Shooting distances will vary widely depending on terrain. Javelina can disappear quickly behind brush, even at close range. I’ve found most shots to be between 20 and 40 yards.
My first javelina with a bow.
Javelina are tough animals. A poorly hit javelina can run away at breakneck speed and be hard to track down, especially in thick or rocky terrain.
That being said, I’ve seen gut shot javelina go down pretty quickly, usually within 100 yards. The tall hair on their backs can trick you into holding too high, so always aim tight behind the shoulder and just below the centerline of the animal.
Javelina tend to stop abruptly when alerted. Unless you frighten him at close range, he’s likely to freeze up for a few seconds and give you time to settle your pin. If he busts out, however, he’ll likely sprint away without giving you a second chance.
Find Fresh Pigs
Over-pressured javelina learn fast how to avoid people. Once you bust a group several times—and maybe even shot at them—they can disappear completely for several days. At that point it’s best to find fresh critters. Continually chasing the same group will result in diminishing returns.
To avoid the curse of disappearing animals, I recommend hunting the opener when the pigs are still in their relaxed routine. If possible avoid hunting on weekends or near busy roads. Head to the backcountry whenever possible, and always have a couple backup areas in case your first area goes bust.
Harvest and Field Care
Despite what you may have heard, javelina provide excellent table fare. The meat is similar to pork, albeit a bit wilder, and lends itself well to southwestern cuisine like tacos and enchiladas.
Javelina skinned and hung to cool.
To avoid funky meat you need to use caution when skinning your animal. Their pungeant scent gland is easily identified on their lower back. Avoid touching it with your hands or knife. Once skinned, wash the carcass with cold water and hang it in the shade to cool
Conclusion
Bowhunting javelina is a fun and exciting way to hone one’s skills during the dark and cold months of winter. They are fascinating creatures that offer a unique challenge in a unique environment. I can’t recommend it enough.
Hunting with passion will take you farther than anything else. When the mountain is just too big and too steep, it’s not physical strength that pulls me up, but a deep-seated, burning passion that keeps my legs churning. It’s much more mental than physical.
I first noticed this back in 2015 while elk hunting with my wife. In the early light I could hear the elk herd moving farther up the mountain. My legs burned as I huffed and puffed steadily behind them. Still, I didn’t stop or rest as I was compelled with great desire to catch up to them. For a moment I felt as though I’d split in half: my boundless spirit was moving ahead of my faltering body, and then reaching back to pull my body along. It was a weird mental moment, but it got me up the mountain despite the apparent physical impossibility.
That drive comes from the hope of infinite possibilities lying ahead, or some magical opportunity lurking in the near future. Unfortunately, this “drive” is nearly impossible to teach; it has to come from within.
How to Find Your Drive
Learning to be passionately driven will bring more success than anything else, even extreme physical training. If you can learn to fan that initial flame into a burning desire, then you’ll find your passion and use it as a tool.
The best way to kindle you hunting passion is to set realistic goals, and then do whatever it takes to reach them. As you begin to have small successes, set bigger goals. By continually striving for bigger and better bucks, your love for hunting grows forever.
Throughout this process, try focusing on the whole hunting package, not just the kill. Take time to appreciate the miracle and beauty of nature. Read and learn about the long history of the bow-and-arrow and its precious heritage down through the ages. Feel the power you transfer to the bow from your own body, and then observe the mystical flight of the arrow into the target. It’s a beautiful, artistic craft!
Be sure to immerse yourself completely into the entire hunting process, from preseason preparation to the final harvest. Try processing the animal’s sacred meat by yourself and you’ll attain a greater appreciation for the animal.
This is the recipe for passion that will drive your spirit up the mountain and towards long-term success.
Avoid Pitfalls
If however your intentions are impure; if you just want to kill something with little regard for the sanctity of life; if you’re really hunting for recognition and ego, then your passion will erode and eventually falter. As exciting as the kill might be, most people—hunters and non-hunters alike—don’t really care about your success. That is, unless you shoot a real monster, in which case they’ll just be jealous.
Conclusion
In the end if you aren’t hunting for yourself, or your family’s dinner table, then you’ll lose your passion for the sport. That’s because the mountain is cruel; it often beats you up and holds out on you. Over time you’ll grow to resent it. Finally, one day, tragically, hunting becomes too much a burden and you don’t return.
Don’t go down this route! Instead foster your passion and you’ll find success afield, whether you harvest something or not.
The release arm, (aka the string arm or shooting arm), is the arm/hand that holds the string while drawing the bow. If you are right handed, then it’s your right hand.
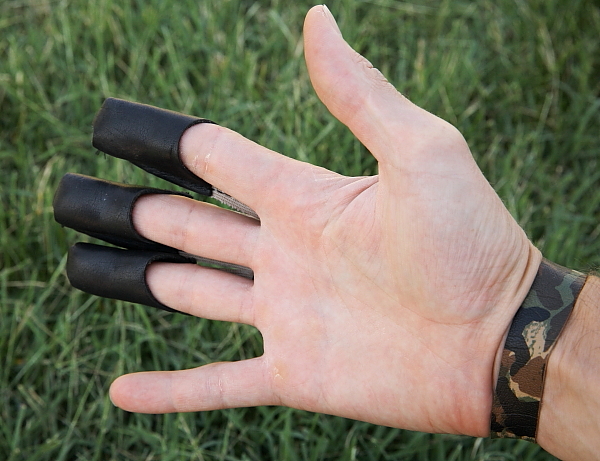
In traditional archery you have the option of wearing a shooting glove or finger tab to protect your shooting fingers (index, middle, and ring finger).
Although it is perfectly fine to shoot with bare fingers on a light-poundage bow, it can be very painful with a heavier-poundage bow. A release “aid” or glove also allows the string to slide off the fingers evenly and with less friction.
Glove-style release aid.
Finger tab release aid.
All newer-model compound bows should be shot with a mechanical release aid. Unlike traditional bows (longbows and recurves), compound bows are designed to be shot in-line with the arrow, string, and rest.
With traditional bows, the string naturally oscillates from side to side as it comes off your fingers. This is normal, and the arrow will straighten itself out in flight.
With compound bows, the arrow leaves the bow at a much higher speeds, and therefore, oscillation will cause the arrow to wobble and shed energy as it tries to re-adjust itself in flight. Therefore, the arrow should be shot with perfect alignment to avoid any oscillation.
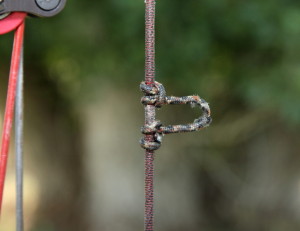
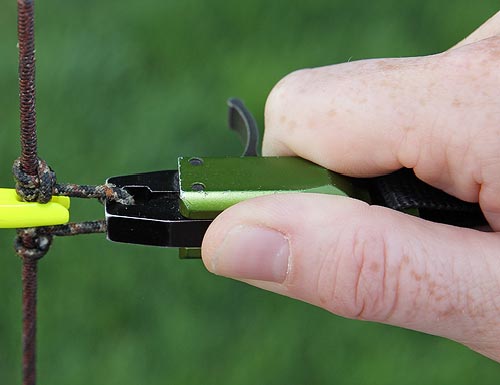
Compound Bow Release
In order to accomplish this, the arrow attaches to the bowstring inside of a D-loop that’s tied to the bowstring. Next, a mechanical release aid attaches to the D-loop to draw the bow back. This keeps the shooters arm aligned perfectly with the arrow.
Compound bow D-Loop.
Mechanical release aid for compound bows.
As an aside, my person favorite release is the Fletcher .44 Caliper Release. This is the smoothest, most reliable, and least expensive release I’ve used.
Traditional Archery Release
With traditional archery, you have two options for grasping the string: 1) One finger above and two below the arrow nock, or 2) Three fingers below the nock.
The advantage of having three fingers below is that it brings the arrow closer to your eye. This helps with aiming. I’ve personally found that three fingers below dramatically increases my accuracy. Try it both ways and see which method works best for you.
One finger above and two below.
Three fingers below. This brings the string closer to your eye.