Stop-Rot is an anti-bacterial liquid preservative that “extends the work time of a fresh hide by slowing down or stopping decomposition,” thus saving your trophy hide from decay and hair loss.
Stop-Rot was developed by taxidermist/chemist, Glen Conley, specifically for saving hides from hair slippage ahead of the tanning process. It has been used widely in the taxidermy industry for many years, and now hunters are starting to use it too.
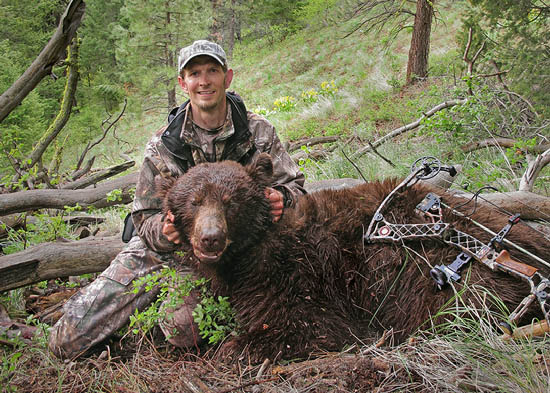
After killing your trophy animal, bacteria immedately begins to multiply all over the animal, especially around wet and bloody areas. In a relatively short period of time, bacteria begins to attack the skin and and hair follicles, thus leading to hair slippage and a ruined hide. A good taxidermist can fix almost anything, but very little can be done to save a hide with hair falling out.
Hair Slippage: This hide was ruined by bacteria before it even arrived at my shop.
Because bacteria thrives in warm temperatures, Stop-Rot is especially useful during early-season hunts that occur in August and September. Traditionally salt was used to preserve hides afield. However, salt dries out the hide and makes it virtually impossible to flesh properly before going into the tanning process.
How to Use Stop-Rot
Stop-Rot can be used on both the flesh side of the hide and the hair side. The instructions say to “apply Stop-Rot as soon as possible after the animal has been skinned.” For this reason I always keep a bottle of Stop-Rot back at camp. I’ll spray it on any bloody spots or short-haired areas like the face and ears. I just spray it on and massage it in. Be sure to spray a light coating over the entire flesh side of the hide.
Applying stop-rot to a freshly-skinned hide.Apply Stop-Rot to facial areas including eyes, ears, mouth, and nose.
Where Can I Buy Stop-Rot?
Stop-Rot costs around $23 a quart and is only available through taxidermy supply companies like Van Dykes. To avoid paying shipping, request a bottle from your taxidermist. If you’re in Southern Utah you can get it directly from me. I never go hunting without this product.
Conclusion
Stop-Rot should be used when hunting in warm conditions or any time you can’t get your hide to a freezer or taxidermist in a timely manner. Although I’m constantly touting the benefits of Stop-Rot, I don’t receive any sort of commissions from it. My taxidermy business, however, relies on usable hides. More importantly is the preservation of your hard-won trophy.
Spring black bear season is fast approaching, so today I’d like to offer my top 10 tips for bagging a black bear spot-and-stalk style.
When I first started bear hunting back in 2012, I studied everything I could find on black bears. I also spoke to several biologist to learn more about bears and habitat. Interestingly, much of the theoretic data I collected proved wrong. For instance, one article stated that early morning was the least productive time to spot bears. But in my experience I saw just as many bears early as late. One biologist mentioned that bears absolutely hate the rain, but I ended up shooting my first bear in a steady rain storm. Go figure.
Ultimately, spot-and-stalk archery success comes from boots on the ground and relentless real-life experience. The following are the most important lessons I learned when hunting bears early on.
Spot and Stalk Black Bear Top 10 Tips:
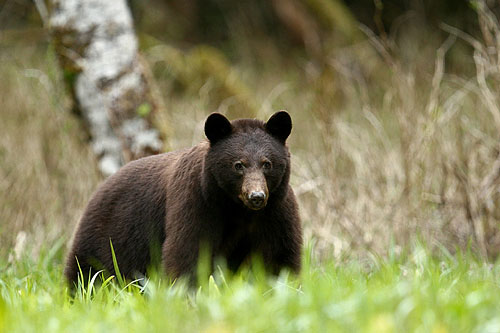
1. Food is Everything: Someone once said that black bears are just big hairy pigs. They eat, dig, and root around constantly, rarely holding still for very long. Since they’re so distracted, it should make them easy to hunt, right? Kinda. Like deer, bears feed for a while, then bed down for a few hours and repeat. The good news is that bears are easy to spot and generally found out in the open.
Bear feeding on south-facing open slope near old-growth forest.
Spring bears primarily feed on new grass shoots, wild onions, clover, dandelions, and other spring offerings. It is imperative to talk to your regional biologist to find out what the bears are primarily feeding on in your area.
Bears in western Idaho feed heavily on yellow flowers called “arrow-leaved balsamroot”.
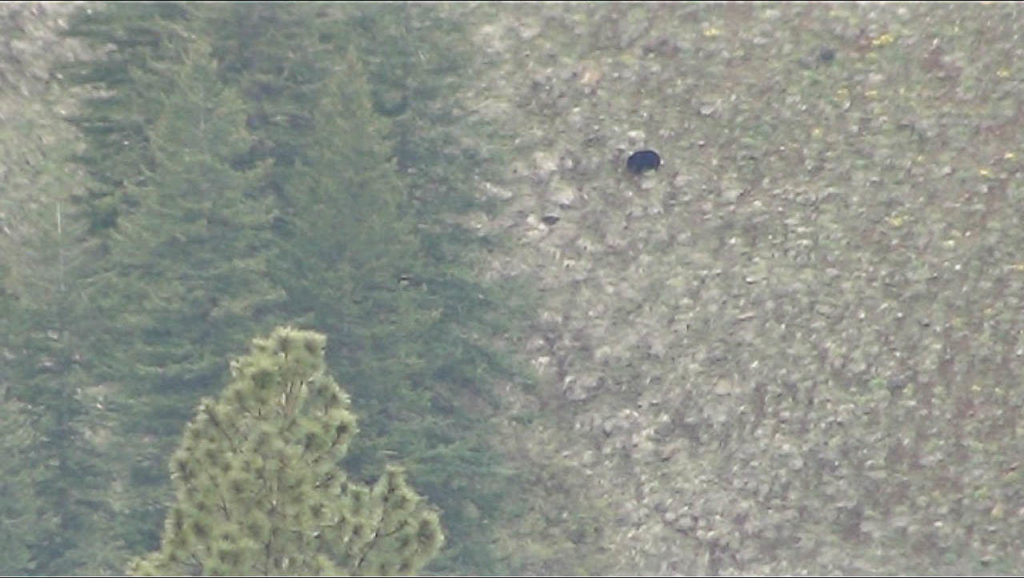
As for time of day, my advice is to hunt bears like deer: Get to a high vantage before first light and start glassing steep, grassy, south-facing slopes adjacent to old-growth forest (used for bedding). Of the nine bears I encountered last year, most were spotted in the early morning or late afternoon.
Even in the best units, you’ll likely glass many miles before actually seeing a bear. If you can’t glass up a bear, keep moving. Get away from busy roads, explore remote canyons, and cover as much ground as possible. Bears are solitary animals and are spread out across their range. This leads to tip #2.
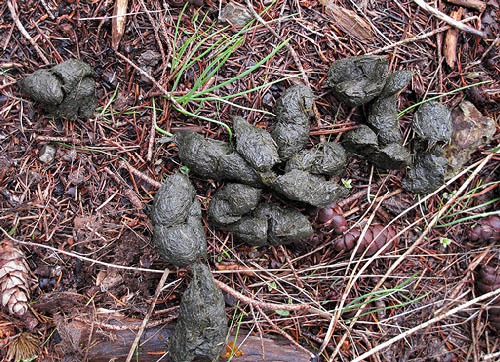
2. Look for Sign: If glassing fails, the next step is to locate an area that looks “beary” and look for sign. You’re looking for large piles of black or green dropping, claw marks on trees, tree trunks rubbed smooth with hair attached, dirt diggings, tracks in mud, turned over logs and other items, and dug-in tracks (see photo below). I’ll break these things down separately as we go, but basically you’re just looking for concentrations of bear sign and focusing your efforts there.
The most common sign you’ll encounter is droppings, aka scat. Droppings come out wet and green, then quickly oxidize to black (within 12 hours in warm weather). If you’re not finding droppings, keep moving.
Fresh green bear droppings.
3. Examine the Trees: An area dense with claw-marked trees is a good indication of a likely bear hang-out. Black bears–especially cubs–like to climb trees which leaves claw marks in the bark.
Claw marks.
Bears also rub on trees just like deer, and they always have their favorite rub tree. Rub trees occur near trails or bedding areas and are generally conifers with easily identifiable, smooth spots with hair stuck to it.
Rub tree located on a saddle crossing.
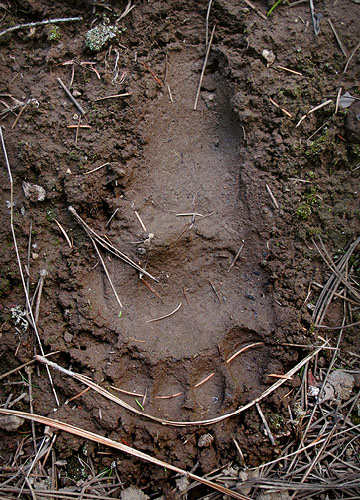
4. Watch for Tracks: Unlike deer, bear leave few tracks because their foot pads are wide and soft which spreads their weight out. Most bear tracks are found in snow, mud, or soft dirt.
Rear foot track in mud.
Another strange phenomon I found was “dug-in” tracks. Dug-in tracks are frequently found near bedding areas. Rather than soft tracks, these are trails that bears use every day while traveling from feed to bed. Because they step in the exact same spots it creates staggered depressions in the ground. (see photo below)
Dug-in tracks.
Bear tracks will help you judge the size of a bear. Basically the main pad (front or back) of a mature bear (sow or boar) will be 4.5 inches or wider. Sow tracks generally don’t get bigger than 4.5″, but a big boar will stretch up to five or six inches.
Five-inch wide front track made by a boar.
5. Locate Bedding Areas: Bear beds are similar to deer beds and are usually located in thick stands of trees not far from feeding areas. Bear beds often look like large nests, where the bear pushes branches and ground cover to the outer edges of the bed. Bears also like to bed on the cool, dark north-face slopes near the tops of ridges. Also, just about every bed I found had multiple piles of scat nearby.
6. Watch for Items Turned Over: What the heck does that mean? Rocks, logs, and cow pies turned upside-down. This is something I never read, but everywhere I found bears or bear sign I found multiple items turned over. A rock lying next to a depression in the ground where it previously lied is most common. In springtime, bears are primarily herbivores, but they really love protein from insects, grubs, mice, and other animals hiding underground. You’ll also encounter occasional diggings. Diggings consist of a random two or three-foot holes dug into the dirt where the bear went after a squirrel or other animal.
7. The Triple “S” of Bear Behavior: Secretive, Shy, and Slippery: Assuming you’ve found a good feeding area with lots of sign, there’s still no guarantee you’ll find a bear. On several of my hunts I found areas littered with bear sign, but no bears anywhere.
Bears are slippery! They have a bad habit of disappearing right in front of you. They mosey behind a tree and they’re suddenly gone from the world. They are such quiet animals and chronically secretive. They are very shy and secretive because they simply don’t want to be found.
Being patient is the key to bear success. When a bear finds a good feeding area/hillside, he’ll likely stay on it for several days. If you’re in a good location, or if you glassed up the bear earlier in the day, he’ll likely re-appear sooner or later in the same general area.
8. Watch the Nose: Bear hunting is technically easier than deer hunting because unlike deer, bears have relatively poor hearing and eyesight. However, the bear’s nose is equal to or better than a deer’s nose. Simply put, if he smells you it’s game over, so always hunt according to wind direction. Be sure to use a windicator often when searching for or stalking bears.
Note: Bears have short attention spans. If a bear sees or hears you, hold very still and he’ll likely forget you were there.
9. Watch the Weather: Just like deer, bears avoid heavy rain or snow. However, a light rain doesn’t seem to bother them. Hungry bears will happily brave the elements… and bears are always hungry! In my experience rain was not a factor, but snow and freezing temps were real bad news.
On two separate occasions I spotted a bear one day, and when the snow moved in, it disappeared from the mountain. This is especially a problem in the early season (April and May) when the bears are living close to their dens. When the snow flies, they head back to their dens and won’t emerge again until the weather gets better. It’s much easier for them to just go back to bed and wait for brighter days.
10. Know the Anatomy: Unlike hooved animals, bears carry their vitals (heart/lungs) further forward in their chest. When a bear is broadside the front shoulder blocks the vitals. Therefore, you must time your shot for when the front leg is moving forward. I learned this the hard way by trying to squeeze an arrow too tight to the shoulder. My arrow hit the bear’s big, powerful shoulder which stopped my arrow short of the vitals. Fortunately he swung around to face me and my second arrow sailed under it’s chin and into the chest. He didn’t go too far, but I was lucky. Fortunately bears don’t react the same way as deer; they’re more likely to stay put after a poor shot instead of instinctively sprinting away.
Conclusion
I hope you found these tips helpful for your spot-and-stalk bear hunt. I realize that the majority of bear hunters prefer using dogs and/or bait, but in my experience there’s nothing more exciting. challenging, or rewarding than getting it done on the ground the old-fashioned way.
Enlarge your consciousness. If your consciousness is small, you will experience smallness in every department of your life. –Robert Pante
Secret Bowhunting Tip: Enlarge Your Consciousness
I always wanted to find an arrowhead. I always felt a great romanticism in stumbling across an ancient bowhunting artifact that paralleled my own plight as a modern hunter. Well, in 2013 it finally happened. On opening morning I headed out across a steep ridgeline on my annual quest for deer. I laid my bow on the ground and pulled up my binoculars to view the new surroundings. When I reached down to pick my bow up, I noticed a small, shiny, black object lying right next to my bow. My heart leapt! For a second I imagined an ancient hunter following his instincts—just as I had that morning—and walking the same path that I was on. It was a wonderful, serendipitous moment.
Big bucks are like arrowheads. What I mean is, you might hunt for years and years without seeing a truly giant buck. But given enough experience, inevitably you’ll stumble across one. Still yet, it may take several more years before you actually get an arrow in one. But if you persist in strengthening your skills and keeping an open mind, one day you’ll wrap your hands around some trophy antlers. After that, it won’t feel impossible anymore, but inevitable. It’s all about enlarging your consciousness.
Two weeks after finding my first arrowhead, I found a second one. I was hunting an entirely different section of the unit, and after setting up camp I hiked to a nearby stream for some water. Just before I got there, my eyes locked onto another black, shiny object. This arrowhead was even bigger and more perfect than the first one. I’m not sure it was entirely coincidence.
Bigger bucks are like bigger arrowheads. It might take many years to finally bag a big buck, but once you do, they come easier. That was also the case in 2013 when I found two arrowheads and bagged the biggest buck of my life, dubbed Superbuck. The story I wrote for that deer was based entirely on building greater success off of previous success.
Entrepreneurs frequently tell a similar story: It took them years and years to earn their first million dollars, but only a short time and a lot less effort to earn their second million. As it turns out, success has more to do with our state of mind than anything else.
So, what does it mean to “enlarge one’s consciousness? When I first read this quote, I asked myself the same thing. Was I infinitely UN-successful in my finances, relationships, hunting, etc., because my vision of life was too small? Was I limited by my physical brain capacity to have a small consciousness? Was I limited by negative influences during my formative years? Yes, I think so. But I wasn’t going to let that stop me from having success in bowhunting. What I needed to do was enlarge my consciousness beyond the old-fashioned style of hunting that mostly leads to failure. So I struggled, studied, and fought against mediocrity, and after years of doing my own thing, I was finally a trophy hunter reborn.
When I set my annual goal to harvest a trophy deer, I envision a real monster buck with huge mass and a wide, sweeping set of antlers. I am conscious of the fact that there are at least one of these stud-bucks in every general unit in the state; I just have to find it. I can set this goal because I know I will consciously and subconsciously do things differently than most hunters who are just hoping to luck out on a nice four-point. I am also conscious of the near impossibility of the goal, but instead of getting discouraged, I just try harder. As it turns out, life is about dreaming big and expecting excellence.
I always wanted to find an arrowhead, and now I’ve found two. I always wanted to shoot a 200-inch trophy buck, and now I have two. I’ve always wanted to enlarge my consciousness, and now I have too.
Advanced archers make shooting look effortless, but it’s only because they’ve put in countless hours mastering the basics. Over time the many components of form become one single subconscious step that happens in the background of the mind. Here are some key tips for improving your shot.
#1: Keep both eyes open
Keeping both eyes open gives you a better sight picture. This is especially important with traditional bows. Because there aren’t any sights on a traditional bow, your focus is on the target. To acquire a more accurate target, keep both eyes open. I still do this with the compound bow, especially if I’m unsure of the distance.
Keeping both eyes open gives me more dimensionality to the target. Everything I do all day requires me to keep both eyes open, so why would I close one when shooting?
Try shooting with both eyes open.
If you close one eye, you are viewing the world in 2D, not 3D. This is not how your brain sees the world. Because I don’t view the world in two dimensions, I don’t aim in two dimensions either.
#2: Don’t Aim
Proper form begins from the ground up: feet placement, proper grip, and drawing the string to your anchor point. It ends with aiming, releasing, and following through. Of all these steps, aiming is really the easiest and least important.
In traditional archery, aiming is accomplished by simply pointing the arrow at the target. In the time it takes to master the other fundamentals, aiming will become “instinctive.” Therefore, your focus should be on consistent form and follow through, not aiming. If your form is correct, the arrow will find the bull’s-eye on its own.
Note: Correct aiming happens by aligning the string with your eye. This is done by touching the string to the side or tip of your nose. I won’t even loose the arrow until I feel the string on my nose.
#3: Touch your ear
What does your ear have to do with shooting? After each shot, your release hand should brush past your face and end up touching your ear. If you make this a habit, I guarantee your accuracy will improve.
Follow-through means your release hand continues back as your bow arm goes forward. If you allow your release hand to move forward on the shot, or up or down, then the string will be pulled–or plucked–out of alignment, causing the arrow to wobble or drift side to side.
The best way to avoid errant arrows is to follow through straight back. Touching your ear means you’ve released correctly.
Follow through by touching your ear after each shot.
#4: Don’t flinch
Where the bow goes, the arrow goes.
Flinching is a major no-no. The two biggest indicators of flinching are a) dropping or raising your bow arm at the shot, or b) lifting your head to see where the arrow hits.
Neither your head nor your bow arm should move until the arrow hits the target. It’s normal for the bow to rock forward or back on release, but your bow arm should remain up and pointed at the target until the arrow hits. Your head—which is slightly cocked to the side—should also remain in frozen in position as well.
The best way to avoid flinching is to have a surprise release. A common mistake is anticipating the shot by focusing on the release rather than follow-through.
Instead, all your focus should be on form. As you reach your anchor point, the arrow and string will simply pull free as you relax your release hand. If you concentrate the release hand, the string will jerk out of your hand causing the arrow to miss.
#5: Use your back
All the power to draw the bow comes from your back muscles, not your arms. I refer to the arms as “deadposts” or “anchors” because they simply serve to hold the bow. The real power comes from your back muscles.
Your back is much stronger than your arms, and that power is transferred to the bow through your arms. Think of you arms as electric power lines which hang loosely in the air. The lines don’t create the tremendous power that surges through them, the power plant does.
The best way to tap into your back power is to stand up straight and squeeze your shoulder blades together. Upon release, your shoulder blades will continue pulling together—almost touching—while your arms pull the bow apart in opposite directions.
Harnessing the power of your back is the only way to load the bow with enough power to execute the shot properly.
#6: Don’t pinch the string
The most common problem I see in beginner archery is simply keeping the arrow from falling off the bow. At least half my beginner students have a hard time keeping the arrow on the bow long enough to shoot. This is caused by pinching the nock.
Leave a slight gap between your fingers.
The string is gripped with three fingers: index, middle, and ring. As you draw the bow back, the fingers tend to bunch up and put pressure on the nock, which ends up pulling the arrow off the shelf.
To keep this from happening, simply leave a slight gap between your fingers as you draw. If the problem persists, try tilting the bow farther to the side and letting gravity hold the arrow for you.
As frustrating as this might be, the problem usually fixes itself over time.
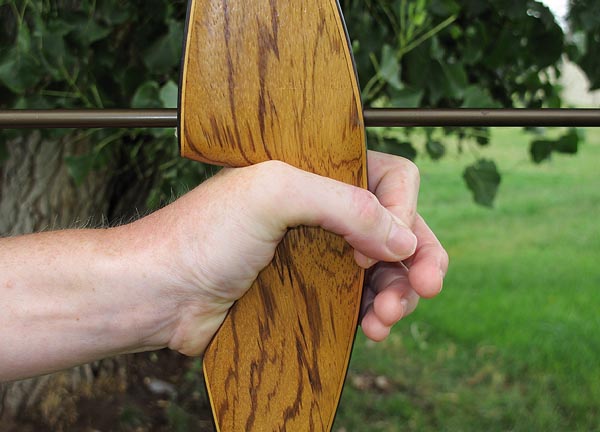
#7: Loosen your grip on the bow
Frequent left and right misses are caused by torquing, or over-gripping, the bow. I call it the “death grip.” People death-grip the bow because they feel like they need to control the tremendous energy they’ve loaded into to the bow at full draw.
Heavy bows have so much power that we think they might fly back into our face if we don’t grip them tightly. In reality, all that energy simply leaves with the arrow and the bow falls limp in your hand. If you grip too tight, you’ll force the bow left or right. Remember, where the bow goes, the arrow goes.
Use a loose grip on the bow to avoid torque.
To avoid torque, simply allow the bow sit loosely in your palm while resting your fingertips lightly on the front of the grip. This allows the bow to settle into its natural alignment.
The best way I’ve found to avoid over-gripping the bow is to simply touch your thumb and index finger together and let your other fingers float in front of the bow (see photo).
Conclusion
With enough practice, anyone can master the art of archery. Just remember that hitting the bulls-eye is a long-term goal. Your short-term goal should to master the basic fundamentals. I promise you, hitting the bullseye will come naturally given enough time.
Enjoy the process and don’t get discouraged. If you have any questions at all, please leave a comment.