Quartering and Packing
In the old days hunters often avoided hunting too far from roads simply because it would be too difficult to drag the animal out if they got one. A lot has changed since then. Today, backcountry hunters quarter or bone out their meat and then pack it out in a trip or two.
Quartering means removing the skin, all four quarters, the back-straps, and whatever other parts you wish to keep, including the ribs, neck meat, liver, heart, etc.
Boning means removing meat from the bones. Boning reduces pack weight by several pounds, but this method has its drawbacks. First, boning takes time to do it correctly. Secondly, it exposes even more meat to contamination from dirt, bugs, and hair. For this reason I advise against boning meat unless absolutely necessary.
Quartering and hanging an animal is much more sensible than gutting and dragging the animal out whole. A boned-out mule deer weighs about 90 pounds and can be packed out in a single trip if necessary.
An elk is about 3.5X larger than a deer. Boned or not, an elk will take two people several trips to pack it out. Whatever the case, just be sure you have an exit plan before launching an arrow.
The basics of quartering big game can be learned from numerous video tutorials found online. Then it’s just a matter of practice.
Quartering can be a daunting or even dangerous task when performed alone, especially on slippery or uneven terrain. Until you’ve gained some experience, try to enlist some help from fellow hunters for tasks like holding legs and hanging quarters. With a little practice, it can be accomplished alone.
Temperature and Spoilage
Heat is the number one concern with meat care. Bacteria grow exponentially on a carcass if allowed to stay warm too long. Meat begins to spoil in temperatures above 40 degrees (fridge temperature). In 90-degree weather—which coincides with many archery seasons—meat can spoil in single a day.
The higher the ambient air temperature, the greater chance of spoilage. Ambient air temperature determines how much time you have to get quarters packed out and loaded into coolers.
When daytime temperatures are above 70 degrees, the animal should be packed out within 24 hours. If daytime temperatures are below 50 degrees, you can take your time, even several days if needed.
Other than rapidly cooling your meat, there are a couple additional ways to extend meat freshness. First, there’s a company out there that makes anti-microbial game bags. These bags can help slow bacteria spread on the surface of the meat where most contamintatin takes place. Second, when flies are an issue, simply rub black pepper all over the surface of the meat.
Quartering Tools
Be sure to carry the right tools for quartering your animal. This includes a very sharp hunting knife with a built-in gut hook, a lightweight folding bone saw, a knife sharpener, and a 4-pack of lightweight game bags.
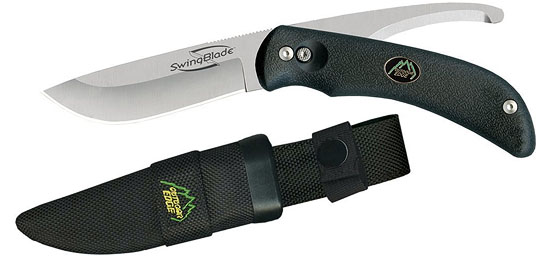
My favorite knife for skinning is the Outdoor Edge Swingblade. The locking blade converts to a dedicated gutting knife. Besides gutting, this extra blade easily unzips the hide and cape without cutting too much hair.
Some hunters prefer razor knives with replaceable blades like the Havalon models. Havalons are extremely sharp and capable of breaking down even the largest animals. But they aren’t ideal for skinning as they can easily cut through the hide.
I personally carry a small surgeon’s scalpel with cheap replaceable blades and use it in conjunction with my skinning/gutting knife. The scalpel is especially useful for caping and removing the hide from delicate facial areas.

Cooling Your Meat
The first step in cooling meat is to open the chest cavity and use a stick to spread the rib cage apart. Next, skin the carcass as soon as possible. The hair and hide is very good at insulating and will hold heat for a long time. An elk carcass left with the hide on can spoil even when left lying on snow.
Skinning is best accomplished systematically as you remove quarters if you’re using the “gutless method.” (See YouTube for videos on the gutless method). In this fashion, the hide is left intact and spread out on the ground as a barrier between dirt and the meat.
Once quartered and bagged, hang the meat in the shade to cool. Either hang the quarters in a tree or prop them up on rocks, logs or bushes to increase air circulation. Even in hot weather, meat will cool rapidly in the shade and will extend pack-out time.
Whenever possible hang the meat in the bottom of a valley and/or near a stream to cool overnight.
You can further cool meat by placing pre-cooled quarters in plastic garbage bags and securing the bags in a stream or river. Just make sure the sun isn’t hitting the bags as they can heat up even when submerged.
Finally, consider packing the meat out at night as this can keep both you and your meat from overheating.
Once the meat is hung you will need to figure out how many pack-out trips it’s going to take. This depends on your physical conditioning, distance, and terrain. Try to figure out how much weight you can safely carry long distances before going afield.
When dealing with trophy animals, the head, antlers and hide will add significantly more weight. You can always remove the antlers and cape from the head in the field, but take extreme care. Without adequate caping experience you could easily damage or ruin your trophy cape.
Using Pack Animals
Whenever possible try to enlist a number of friends and/or pack animals for the job. With today’s lightweight frame packs there’s practically nothing you and a couple buddies can’t pack out given enough time. The problem with backcountry hunts is that you may not have enough time to get the animal out before it spoils. This is where pack animals come in handy.
For backcountry wilderness hunts, consider hiring a horse packer. My brother once harvested a 2000 pound bison at the bottom of a snowy chasm. Retrieving his once-in-a-lifetime animal was only made possible by hiring a horse packer. It costed several hundred dollars, but was well worth the expense.

Another option is renting llamas or pack goats. My brother has a string of pack goats that have proven invaluable for packing elk out of the backcountry.
Having a couple horses will open up the vast wilderness to more hunting opportunities. Legendary trophy hunters like Kirt Darner and Robby Denning frequently relied on horses, not only for access, but for getting their trophies out of the backcountry.
The biggest drawback to owning pack animals is the year-round expense and maintenance involved, not to mention the burden of caring for them afield. But in my opinion, these trade-offs are tolerable if it means consistent success on trophy bucks.
Conclusion
It’s much easier to spend a couple extra days packing a critter out of some hell hole than hunting easy-access country for weeks on end without success. You just need to have an exit plan. This means being in good enough shape for an arduous pack-out, or using pack animals for the task.