Tag Archives: taxidermy

How to Choose a Taxidermist

How to Choose a Taxidermist

It’s often said that one should spend as much time researching taxidermists as they do researching their hunt. That’s because a taxidermy mount embodies the memory of your hunt for a lifetime. A quality mount is not cheap, but neither is your hunt. While your hunt will soon be over, the memories will remain. So isn’t it worth investing a little time and money in a quality mount? In this article I’ll guide you through the process of selecting a quality taxidermist.

Before we begin, I should mention that I’m a professional taxidermist living in Southern Utah. My business is Nate’s Taxidermy and I’ve been mounting big game animals for ten years. I’m not seeking to score more business with this article, but rather help fellow hunters figure out how to get professional quality mount.

One reason I became a taxidermist was the vast unprofessionalism I encountered in the industry before I became a taxidermist. Turnaround time was always delayed, craftsmanship was questionable, and professionalism was unheard of. Calls mostly went unanswered and any guarantee of quality was non-existent. With this in mind, here are my top suggestions for anyone searching for a taxidermist.

Quality of work

First off, visit as many taxidermy studios as possible. Every taxidermist should have a well-lit showroom with a variety of species to inspect. The goal of taxidermy is to bring the animal back to life…or close to. Do the specimens look “alive”?

Begin by asking what skills and methods separate them from their competition. When touring showrooms look for things like symmetry in the face, especially the eyes and ears. Watch for drumming (places where the skin has pulled free of the form). This usually occurs in highly detailed areas like the face, inside the ears, and around the legs. Drumming indicates low-quality glue or cutting corners.

Another place to inspect is antler bases. Make sure there aren’t any gaps or separations where the hair meets the horn. Also, take a close look at habitat bases. If you see something weird in your wanderings, ask about it. A real professional will be honest and friendly, and value you beyond the money you’re spending.

Turnaround Time

Unless you are in a big hurry with your mount, don’t base your decision solely on a fast turnaround time. That being said, your mount should be finished within a reasonable time, say 8 to 12 months. Good taxidermy takes some time, but not years.

Most high-volume taxidermists use commercial tanneries, which are better than in-house tanneries (in my opinion). But most commercial tanneries are currently 8 months out due to supply-chain and staffing issues. As of 2023 you can expect completion times can to be a little longer.

Once the hide is back from the tannery, it shouldn’t take more than a month or two to complete. If your taxidermist keeps extending the time he quoted, or making excuses—like blaming the tannery—then beware. A taxidermist who accepts too much workload is more likely to cut corners on your mount.

Quality of Materials

Most people would be hard-pressed to distinguish whether cheap materials and high quality ones were used in the final mount. But there is a difference. Just like a food recipe, the quality of the final product depends on the culmination of ingredients. It would behoove you to ask about various materials used.

Start with the tanning process. Was the hide professionally tanned, or just “dry preserved?” Dry preserved isn’t really tanning, and in my opinion should never be used since it will drastically decrease the shelf life of your mount.

Next is the glue (aka hide paste). Hide paste is what holds the whole mount together. There are a variety of glues on the market, but many taxidermists are still using dextrin-based glue simply because it’s very inexpensive. Dextrin works, but it’s also a food derivative (from corn starch) which can attract bugs. Modern synthetic glue is much better. Some glues even contain bug-resistant additives.

Synthetic glues are more expensive, but they’re necessary for the long term survival of your mount. So be sure to ask about the glue! There are many other materials used as well–things like eyes, ear liners, paint, etc—but most are visibly apparent. Basically, if the mount looks cheap, it probably is.

Professionalism and Paperwork

Anyone working in the dead animal business is gonna be a little strange (myself included). Still, no business can survive without some basic customer service skills. Why should taxidermy be any different?

Let’s start by answering the phone. Simple, right? Nope. I recently tried to call a fellow taxidermist for a month straight before giving up. Apparently it’s still a problem in our industry. If your taxidermist does answer the phone, is he courteous and helpful?

What about paperwork? In the past I was given a little, scribbled receipt showing little more than my deposit was paid. When I opened my own taxidermy business I started with the paperwork.

When a client brings me a project, they receive a signed agreement with various details including balance of account, turnaround time, guarantee of quality, desired mount position, and even measurements taken from the carcass. When they pick up their finished piece they receive a “care sheet” for the long-term maintenance of their mount.

Professionals should also have a decent website with updated photos, contact info, and other helpful information.

Clean and Orderly Workspace

When you visit the taxidermy shop, is it clean, orderly, and well lit? Or is dark, dingy, smelly and cluttered? Similar to a mechanic’s shop, working conditions often reflect in the quality of service. For example, taxidermy requires a myriad of specialized tools. How can a mount be done properly if the taxidermist can’t find the right tools?

Cleanliness is also vital in a shop. A sanitary workspace prevents insect infestations, as well as bacterial cross-contamination from one project to another. I once visited a shop with a huge bison skull rotting under a table. It smelled so bad I could hardly breathe. The taxidermist didn’t seem to notice, but it didn’t help my confidence any.

Specialization vs. Generalists

One of the first questions to ask a prospective taxidermist is which animals they specialize in. This can usually be discovered on their website, if they have one.

Some taxidermists are generalists while others are specialists. Some guys specialize in birds; others specialize in big game (myself included). There are also specialists in skulls, fish, African game, and small game.

A generalist does everything–fish, deer, skulls, etc. This is fine and dandy, but such a broad spectrum of work requires many more years of training and experience. African big game–which includes vastly more animals–is more specialized than North American big game and also requires more specialized training.

In the end, just make sure you’re not dropping a deer off at a fish guy with little experience in big game.

Experience and Training

Be sure to ask about experience and training. How many years has the taxidermist been in business? How many times has he mounted the specific animal you’re interested in? Where did he get his training from? Did he go to a specialized taxidermy school or was he trained as an assistant? Both are fine so long as he’s acquired the requisite foundation in his field of taxidermy.

Experience matters. Every animal and every animal manikin (form) is unique, and thus requires some level of customization. Only specialized training and experience will guarantee the accuracy of your mount.

Customer References

It’s a good idea to request a reference list of previous customer phone numbers from your prospective taxidermist. With a deer or duck you might be fine with just visiting his studio. But with an especially large or expensive mount (e.g. life-size grizzly bear, bison or musk ox) you’d be best making some calls.

A few key topics to discuss with past customers is turnaround time, customer service, and quality of their finished mount. I would also ask long-term customers how their mounts are holding up over the years, and whether or not they would use that taxidermist again.

Conclusion

That’s about it, folks. I know these are mostly common sense items, but you don’t want to take chances with your once-in-a-lifetime memories.

Taxidermy is as much an art as science. Science says your mount should accurately recreate the living creature. A good taxidermist will ‘bring the animal back to life.’

Art, on the other hand, is subjective. That’s where finding the right taxidermist with the right style comes into play. Style varies from artist to artist, so your goal should be to find the taxidermist who reflects both the “look” you desire and an accurate representation of your trophy.

Stop-Rot: Saving Your Hide!

What is Stop-Rot and why do I need it?

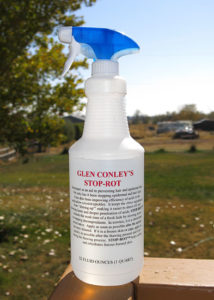
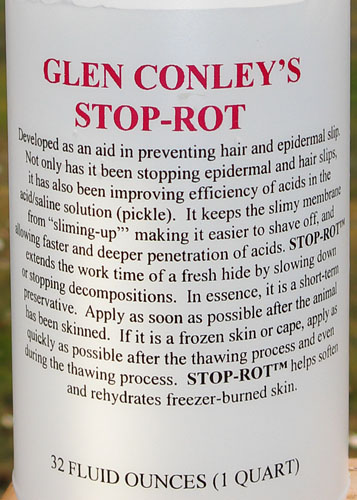
Stop-Rot is an anti-bacterial liquid preservative that “extends the work time of a fresh hide by slowing down or stopping decomposition,” thus saving your trophy hide from decay and hair loss.

Stop-Rot was developed by taxidermist/chemist, Glen Conley, specifically for saving hides from hair slippage ahead of the tanning process. It has been used widely in the taxidermy industry for many years, and now hunters are starting to use it too.

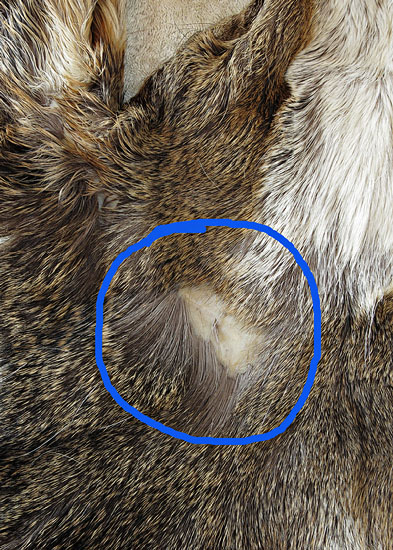
After killing your trophy animal, bacteria immedately begins to multiply all over the animal, especially around wet and bloody areas. In a relatively short period of time, bacteria begins to attack the skin and and hair follicles, thus leading to hair slippage and a ruined hide. A good taxidermist can fix almost anything, but very little can be done to save a hide with hair falling out.

Hair Slippage: This hide was ruined by bacteria before it even arrived at my shop.

Because bacteria thrives in warm temperatures, Stop-Rot is especially useful during early-season hunts that occur in August and September. Traditionally salt was used to preserve hides afield. However, salt dries out the hide and makes it virtually impossible to flesh properly before going into the tanning process.

How to Use Stop-Rot

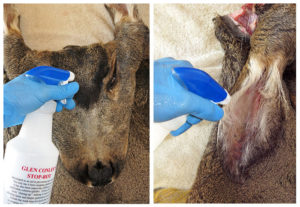
Stop-Rot can be used on both the flesh side of the hide and the hair side. The instructions say to “apply Stop-Rot as soon as possible after the animal has been skinned.” For this reason I always keep a bottle of Stop-Rot back at camp. I’ll spray it on any bloody spots or short-haired areas like the face and ears. I just spray it on and massage it in. Be sure to spray a light coating over the entire flesh side of the hide.

Applying stop-rot to a freshly-skinned hide.
Apply Stop-Rot to facial areas including eyes, ears, mouth, and nose.

Where Can I Buy Stop-Rot?

Stop-Rot costs around $23 a quart and is only available through taxidermy supply companies like Van Dykes or Trufitt. To avoid paying shipping, request a bottle from your taxidermist. If you live it Utah, you can buy Stop-Rot at Trufitt’s taxidermy supply store at 1744 South Redwood in Salt Lake City. In Southern Utah you can get it directly from me. I never go hunting without this product.

Conclusion

Stop-Rot should be used when hunting in warm conditions or any time you can’t get your hide to a freezer or taxidermist in a timely manner. Although I’m constantly touting the benefits of Stop-Rot, I don’t receive any sort of commissions from it. My taxidermy business, however, relies on usable hides. More importantly is the preservation of your hard-won trophy.

Stop-Rot: Use it or lose it!

Taxidermy Turkey Fan Mounts

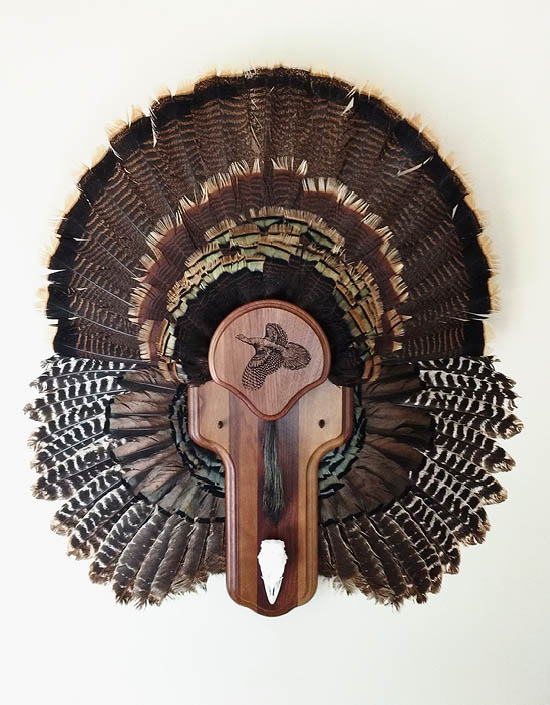
Deluxe turkey fan with wings, fan, spurs, beard & skull.

Taxidermy Turkey Fan Mounts

In just the last three decades, previously nonexistent wild turkeys have flourished in Utah. Now anyone can buy an over-the-counter general turkey tag and go out hunting for these big, noisy, and tasty birds every spring.

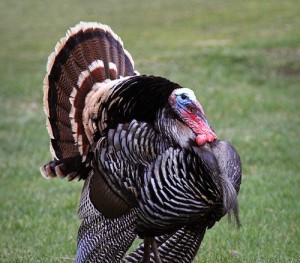
Strutting display of a Rio Grande tom turkey. (Photo courtesy of Utah DWR)

If you apply for a “limited entry” turkey tag, you can even hunt them in April, a full month before general hunters. This definitely  increases your odds of success.

Once you’ve harvested a great gobbler, it seems a shame to just  waste all those unique, iridescent feathers. The wild turkey is no Thankgiving birdis is no thanksgiving bird;  it is nature’s beauty at it’s finest.

Fortunately, your friendly, neighborhood taxidermist (me) now offers a wonderful way to display your turkey and preserve all those exciting hunting memories for a lifetime. I proudly present the…

Turkey Fan Mount

Turkey1a
Standard fan mount w/ beard and spurs.

This turkey was taken by my brother, Brent.  Congratulations on a fine, adult strutter!

Turkey2

The spurs shown on the plaque above are used for fighting among breeding males.

Turkey fan mount with beard, spurs, and skull.

If you’re interested in having your turkey fan mounted, prices start at $100. There’s an additional cost if you want to include the skull and/or wings. You can choose an engraved nameplate attached.

For more info, visit natestaxidermy.net.

Note:  I don’t sell the wood plaque mount, I just mount the bird on the plaque. If you’re interested in mounting one yourself, the mounting kits are available on Amazon and some sporting goods stores.

HAPPY HUNTING!

Mule Deer Age Progression

Mule Deer Age Progression:  Antlers

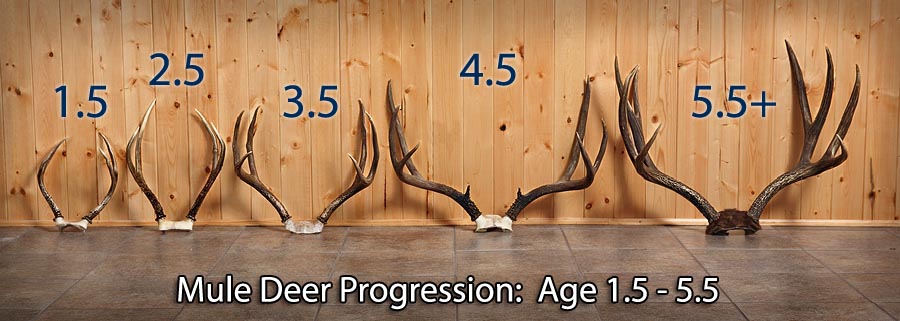
This is pretty neat. I got a bunch of younger deer in for taxidermy this year (including my own) ranging from 1.5 to 5.5 years old. So, I lined them up in order of age for this photo.  (Click to see larger version).

progression2
Mule deer antler age progression based on size.

The reason they are aged in half-year increments is because all mule deer are born in spring, and then harvested in fall, making the youngest legal buck 1.5 years old. Before that, they are fawns without antlers.

The buck on the far right is my late grampa’s largest buck.  It’s a beautiful, symmetric 4×4 without eyeguards. Without seeing the buck’s teeth, I can only guess the age at 5.5, although it could be as old as 7 or 8.

It can be difficult to age large bucks just by their antlers because after they become fully mature (4.5 years), genetics plays a big part in determining antler size.

The best way to age a buck is to look at tooth wear. After 5 or 6 years there will be noticeable wear on the back molars. They become less jagged and more flat. Eventually all the molars flatten down to the gum line while the front teeth (aka biters) fall out one by one.

The next best way to age a buck is to look at antler bases. Old bucks (from 8 to 10) grow similar size racks each year, but they are thicker around, especially at the bases. This is called “mass.”

Very old bucks (10-12 years old) tend to regress in antler size because their teeth become so worn that they can’t get enough nutrition from their food. At that point they slowly starve and/or freeze to death during winter. Mother Nature can be a cruel beast! And you thought hunters were cruel…

The one thing that would enhance this photo is a true giant in his prime, aged 9 – 11 years.  A “superbuck” scoring into the mid-200s would dwarf them all.

The Art of Taxidermy

wood-flat

The Art of Taxidermy

I’ve been busy doing a lot of taxidermy lately, trying to get caught up after a busy hunting and photography season. One aspect of taxidermy that I really enjoy is the meditation. Anyone who’s done taxidermy knows that it can be very time consuming and sometimes a little tedious. This is good because it gives the taxidermist plenty of time to reflect on things such as the animal’s life, which is the taxidermist’s job of reconstructing.

But dissecting and reconstructing a dead animal isn’t for everyone. I believe it takes a certain type of personality to pry the eyeballs and brains out of a skull. Taxidermists can be strange folks…

TaxiClass_078b

The following is a passage taken from my taxidermy website, natestaxidermy.net, that that might help you understand the art and purpose of taxidermy:

Taxidermy often gets a bad rap. The dead heads hanging on people’s walls often evoke negative feelings in non-hunters. They don’t see a glorious and noble beast, but a poor, innocent creature sacrificed purely for sport or to boost the ego of a heartless hunter. I have a hard time understanding this point of view because to me, that noble beast peering out from the wall is a tribute to the animal’s life, not its death.

All year long I admire and photograph both elk and deer in nature. I don’t particularly even like to kill them. But for a brief period in early fall our roles change from admirer and admired, to predator and prey. It’s a natural shift which always shifts back following the hunt. I know that hunting (by any predator) is a good and necessary thing which sustains balance in nature. I think the deer understands this too because all year long, whether I’m stalking with a bow or a camera, I’m treated like a predator, and the animal acts like prey. They don’t know anything else. This is why the biggest and smartest of them are so hard to hunt, and also why they deserve such admiration.

taxi2

When I mount one of my own animals, I feel I’ve preserved not only the memory of a great hunt but the memory of a beautiful and admirable creature. I love wildlife as much as I love to hunt, and through painstaking care I can immortalize that special animal. If it weren’t for taxidermy, millions of beautiful beasts would still be harvested each year, but then discarded and forgotten. A quality taxidermist gives the animal a new home and continued life.

IMG_0299 copy

I won’t lie; I’m fairly new to the taxidermy arts. However, I’ve been doing European skull mounts for friends, family, and myself for more than a decade. My interest in taxidermy began in 2002 when I harvested a very large 4×4 buck and didn’t have enough money for a full mount. Through much research and trial and error, I was finally able to perfect a beautiful European skull mount on a custom-designed wood plaque.

Fall 2012 011

Years later, after mastering the European mount, I developed a keen interest in furthering my taxidermy skills. So in April, 2013, I went to taxidermy school and have been learning and expanding on my education ever since.

TaxiDiploma