Tag Archives: hunting techniques

How to Blood Trail Wounded Animals

Blood-Trailing Wounded Animals

Sooner or later every bowhunter will have to deal with a poorly hit animal. An ethical hunter must do whatever it takes to follow-up and recover wounded game. Arrow-hit deer rarely go down immediately, so every hunter needs to understand the basics of  blood-trailing. In this article we’ll look at some tips and tactics for tracking wounded deer.

An arrow kills a deer differently than a bullet. Bullets rely more on shock and devastating tissue damage, whereas an arrow kills either by massive blood loss due to arterial damage, or through asphyxiation by deflating the lungs.

A third and much less effective method is septic shock. Septic shock, or blood poisoning, is the result of gut-shot animals slowly dying as their stomach contents and bacteria gradually overwhelm the blood stream. Basically the deer dies from a full-body infection over the course of several hours or even days. Oftentimes the animal is lost because it bleeds very little and covers lots of ground.

Give it some Time

Unless the animal goes down within sight, you need to give it some time to die. Even if you’re confident in a heart or lung shot, you should still wait a half hour minimum before tracking.

If you suspect a gut shot, wait at least two or three hours before tracking, and then proceed very cautiously while glassing ahead. If it’s very cold out, it would be probably be fine to leave it over night.

Whatever you do, don’t go barreling in on the deer. Arrow-shot deer sometimes don’t realize they’ve been hit and will only run a short distance before bedding down. You do not want to bump the animal, but if you are able to stalk close enough, try to get a second arrow in the animal to put it out of its misery.

Weather Factors

You do not want to leave a mortally hit animal sitting for several hours in hot weather. Even a marginally hit animal will slow down and stiffen up within a few hours, so possibly bumping him is still better than letting the whole animal spoil overnight. Just use your best judgment based on the conditions you’re dealing with.

In rainy or snowy weather you should hasten your tracking job. Water will quickly wash away any blood, and snow can cover it up.

Where to Start

Immediately following your shot, mark the spot you shot from with orange tape, and then mark the place where the deer was standing. Next, see if you can find your arrow and inspect it carefully. Bright red, bubbly blood is usually lungs. Any green smears or foul smells indicates stomach, and very dark blood can anything from muscle to heart or liver. Heart shots are obvious as they tend to bleed profusely.

Once you’ve determined the quality of your hit, try to pick up the blood trail. The secret to successful animal recovery is moving slowly, as if you are still-hunting. Make very little noise and glass ahead frequently. If at all possible, move with a favorable wind.

While blood-tracking, plan on following both blood and tracks. Sometimes a deer will bleed completely internally, in which case you will rely more on tracking than blood-trailing. Fortunately running deer tend to leave very deep and obvious tracks accompanied by torn-up ground.

Inevitably you’ll get stuck with a very sparse or problematic blood-trailing job. If the blood trail is very light, you should follow these guidelines:

Tips for Following Sparse Blood Trails

  1. Don’t step on or disturb any blood specks or tracks. You may have to return back to these clues later on.
  2. Continually mark the blood trail as you go, either with a GPS, orange tape, or toilet paper. By keeping track of the trail you may be able to determine the general direction the buck is headed.
  3. In places where you are unable to see tracks, you can still determine the direction of travel by reading blood splashes: they always splash forward. If the blood trail is sparse, you can tell the direction of travel by which side of the grass the blood is on.
  4. In the evening you might have to track faster. It’s much harder to trail a buck in the dark, but if you must just be sure to have a very bright flashlight. This will not only help you locate more sign, but will light up the deer’s glowing eyes far ahead so you don’t bump him further.
  5. If the trail runs cold, consider enlisting the help of a blood-trailing dog. Dogs trained to follow blood trails are becoming a popular method for recovering wounded game. Once the deer goes down, it won’t last long sitting in the field, so consider getting the dog handlers contact information before the hunt.
  6. If you lose the trail completely, you will have to employ a “grid-search” beginning where the last sign disappeared. At this point you should be able to “guestimate” the deer’s general direction of travel. Use your GPS to keep track of everywhere you’ve been and where you haven’t. Because you are now on a timer, grid-searching should be done with as many helpers as possible.

Final Thoughts

Contrary to popular belief, wounded animals don’t go directly to water, nor do they run directly downhill. Rather their first inclination is to put as much distance between you and them as possible. Given enough time the animal will eventually seek out water, but don’t count on it.

As for direction of travel, I’ve seen mortally wounded animals run uphill or downhill. But more often they side-hill or slant downhill over very long distances. Once again, every shot situation is different, so use your best judgment.

On rare occasion a deer that seems mortally hit will escape and make a full recovery. This happens a lot with high hits in “no-man’s-land,” as it’s sometimes called. Other times the arrow may have only contacted muscle tissue. Either way, you’ll likely never catch up to the animal. That doesn’t mean you shouldn’t try; it just means there are times when you must throw in the towel. Only experience can tell you how to proceed.

How to Conquer Buck Fever


What is Buck Fever?

Buck fever is a state of panic brought on by an intense hunting situation, followed by a huge adrenaline surge. It’s basically your body’s fight-or-flight reaction. If you’ve never experienced buck fever, then you either haven’t seen a 200-inch buck up close or you’re just one cool customer.

For the rest of us, buck fever is a very real and formidable foe. It still haunts me today! When that long-awaited moment of truth comes, when that giant buck finally steps into the open, I feel like a little kid trembling in my boots. This intense excitement is why I love bowhunting so much. Unfortunately it’s also the reason I still miss shots on big bucks.

On my second archery hunt back in the nineties, I had a true monsterbuck step out broadside at 35 yards. Sure enough I came completely unglued and proceeded to send my arrow into the dirt at his feet.

Today’s bows are consistent tack drivers. Unfortunately we let ourselves get in it the way of their performance. The ultimate goal in archery is to eliminate yourself as a variable, and the best way to do that is through diligent practice.

How to Practice for Buck Fever

  • The most effective way I’ve found to practice for buck fever is by getting your heart rate up during practice sessions. You can do this by sprinting to and from your target. Start by shooting one arrow and then sprint to the target, pull the arrow, and sprint back. Shoot again and repeat. This will quickly get you’re your heart rate and breathing up. Do this exercise repeatedly until you are a huffing, puffing wreck. I’ll admit, this kind of practice isn’t very fun, but it’s the best way to prepare for buck fever.
  • Shooting competitively is another way to practice for buck fever. Every major city in the country has archery clubs and regular competitions. Shooting competitively and publicly puts the pressure on and ups the excitement level, especially when competing for money and prizes. Just like other adverse conditions practice, learning to shoot well under pressure is a valuable skill.
  • While hunting there are a few ways to cope with buck fever. First, try to slow your breathing. If you have time before the shot, take a few deep breaths and exhale slowly. Second, avoid getting tunnel vision. Tunnel vision is basically where you lose situational awareness because you’re hyper-focused on one thing, like the deer’s incredible rack. Instead, take a second to expand your view. Look around for any other deer that you might have missed. Whatever you do, don’t rush the shot. Most bowhunting scenarios play out slowly, and rushing things just causes mistakes.
  • When the shot finally comes together, put all your focus into following through. Hunters under pressure usually miss low because they “drop the bow” on the shot. Instead, focus on keeping your sight pin on target until the arrow hits. Keeping equal palm pressure across the bow’s grip also helps with follow through.
  • One more tip:  When a buck suddenly appears at close range, it’s common to misjudge the buck’s size amidst all the excitement. This can lead to shooting a buck you aren’t happy with. For this reason I refuse to pull an arrow until I’ve judged the buck and I’m sure he’s a shooter. Pulling an arrow creates momentum, and when you combine momentum with excitement it leads to smaller bucks, or worse, missing the big one.

Conclusion

These are the best methods I’ve found to practice and prepare for buck fever situations. Buck fever might be an incurable affliction, but it also means you’re passionate about hunting, and that’s a good thing.

Good luck out there!

Ambush versus Still-hunting

Ambush vs. Still-hunting vs. Spot-and-Stalk

Ambushing

Because of the extreme wariness of big bucks, ambush hunting is the most effective style of bowhunting. In close-quarters situations, whoever moves first–you or the deer–is at a disadvantage.

Esther sitting ambush for turkeys.

In very thick brush or noisy terrain, ambush hunting might be your only option. This is why so many whitetail hunters sit tree stands. For mule deer, however, hunting from tree stands or ground blinds is only minimally effective because mule deer are so unpredictable. Therefore, ambush hunting is most effective only after you‘ve patterned a buck and are able to sit near prime feed or trails without being detected.

Ambush hunting is also a great option for novice hunters who haven’t mastered extreme stealth yet. It’s also a good technique in desert areas like Southern Arizona where sitting water is a viable option.

Still-Hunting

Still-hunting is the second most effective hunting method. Still-hunting is where you move very slowly through the woods while stopping frequently to glass and listen for movement. Still-hunting takes a lot of practice to master.

When still-hunting you must vary your approach speed as terrain changes. Whenever you come to a rise or break from heavy cover, stop and glass ahead. While still-hunting, try to keep to the shadows as much as possible since deer have a hard time seeing into shadows.

Still-hunting in winter.

The goal of still-hunting is to be non-existent. That means hunting against the wind while remaining perfectly silent. Different ground conditions will dictate the speed that you can travel. Still-hunting works best on soft dirt or wet substrates. When the ground is dry and crunchy, try to step on large rocks, logs or soft dirt patches whenever possible. If you continue to get busted while still-hunting, revert back to ambush hunting.

Spot and Stalk

Spot-and-stalking is where you glass up an animal at a distance and then implement a strategy to stalk close. Spot-and-stalk works best in more open terrain where you’re able to sit and glass for unsuspecting animals that move between cover.

Spot-and-stalk begins with glassing for animals and then planning an effective approach.

A successful spot-and-stalk strategy means planning the best approach based on wind and cover. In most cases the terrain will look differently as you close in on the animal. So it’s best to pick out prominent landmarks along the way, like a large boulder or dead tree. When covering very long distances it can also be helpful to take a reference picture before stalking just in case you get turned around.

Personal Preference

Ultimately the hunting style you choose depends on specific hunting conditions, terrain, and the method you’re most comfortable with.

Maybe I’m just impatient, but I prefer still-hunting over ambushing. I really like the freedom to move around and cover lots of ground. The majority of my trophies were taken while still-hunting, but in most cases I was lucky to either see or hear the deer before it saw me. It also helps to have thousands of hours practice.

Most of the time I will incorporate a hybrid-style of hunting that alternates between ambush and still-hunting. Basically I still-hunt around prime areas, and if I encounter a likely  travel route I’ll plant my butt in the shadows and sit ambush for longer periods of time .

Although most of my bowhunting takes place areas too thick for long-range glassing, I still rely on spot-and-stalk techniques when the occasion arises.

Why I Switched BACK to a Fixed Pin Bow Sight

Why I Switched BACK to a Fixed Pin Bow Sight

In 2016 I switched from a fixed pin sight to a one pin “slider” sight. That year I harvested a bear, deer, and an elk. I was sold on a one-pin sight, and for good reason. (Here’s the link to that article).

Then, in 2017, halfway through the deer hunt, my slider broke. The gears simply stripped out. Thankfully I had my backup bow in camp and was able to swap back to my old multi-pin sight.

When I got home I bought a slider sight and used it for a while, but it didn’t stick. Eventually I went back to my fixed pin sight and never looked back. In this article we’ll look at the pros and cons of using a fixed-pin (multi-pin) bow sight.

My TruGlo fixed-pin, composite bow sight.

Fixed Pin Sight Pros:

  • Fixed pin sights work with all bows and draw weights. But lower poundage bows aren’t always compatible with sliders. Especially at longer distances (usually over 60 yards) the sight housing adjust lower and lower until it actually comes into contact with the arrow or fletchings. What good is a single pin sight that can’t be dialed over 60 yards? This was the main issue I had while using a single-pin sight on my 60-pound hunting bow.
  • Unlike single pin sights, multi-pins don’t require extra hand movement when adjusting for moving targets. One-pin sights are great for stationary targets, but in the thick stuff you have to be ready for anything. Once you draw your bow, it’s not possible to readjust the sight if the animal moves, especially if it’s moving rapidly toward or away from you. Animals that move a lot—like bear, javelina, and turkey—are especially problematic with one pin sights. When hunting open terrain or when dealing with longer yardages—say 40 yards or more—movement isn’t a big issue because the animal is less likely to notice.
  • Fixed-pin sights don’t have moving parts. Once you’re sighted in, you just tighten down the screws and go. Moving parts can wear out or break easier than stationary parts. That’s what happened to me; my slider simply stripped out from normal use. And on a hunt no less! This is not acceptable.
  • Fixed-pin sights tend to be lighter than single pin sights. Slider sights with lots of working parts tend to be heavier than fixed pin sights. Of course accessory weight isn’t a big issue unless you’re already lugging around a heavy aluminum bow, or if you’re a backcountry bowhunter where weight is always an issue. Both apply to me, so using a lighter sight is better. My bare bow already weighs nearly 4.7 pounds, so accessory weight is a real issue. BTW, my favorite lightweight sight is the TruGlo Carbon XS Xtreme carbon-composite bow sight. At 4 ounces it weighs half as much as my old slider.

Now for the cons.

Fixed Pin Sight Cons:

  • The pins in a fixed sight take up more space in the sight picture. A long row of pins is not only distracting, but can block much of an animal’s vitals. It’s much easier to place a single pin on a small target than to wade through multiple pins, especially in a high-stress situation. However, using smaller diameter pins (.019 or smaller) mostly solves this problem
  • Shooting between the pins (aka pin gapping) takes practice. If you’re shooting heavy arrows and/or pulling a light draw weight, the pins on a multi-pin sight will be spaced widely apart. So shooting odd-yardages means shooting between the pins. This takes some practice to get use to. It’s much easier to just dial up the exact yardage and hold the pin on the target.
  • Selecting the right pin under pressure can lead to mistakes. This was the reason I switched to single pin sight in the first place. It’s rare that I select the wrong pin, but it can happen. And the more pins you have, the easier it is to make mistakes. That being said, mistakes are just as common with a slider sight. Anyone who has used a slider will admit to forgetting to move the pin from time to time. Mistakes happen with both sights.

Conclusion

There are pros and cons to using single- or multi-pin bow sights. The decision should be based on the type of hunting you do, your personal bow setup, and most importantly the sight you’re most comfortable using in real hunting situations.

In tournament or target shooting, I prefer a slider. In open country where long shots are the norm, I would definitely go with a slider. But in heavy cover or backcountry use, I’m more comfortable with a multi-pin sight.

Six years ago I swore I’d never go back to a fixed pin sight, yet here I am. What’s the lesson here? Never say NEVER.

Squirrels: The Bowhunter’s Nemesis

A Real Threat to Bowhunters

I’ll never forget. Ten years ago I rounded a large fir tree and spotted a 180-class buck bedded in some deadfall at thirty yards and facing directly away from me. But before I could even pull an arrow, a nearby squirrel lit up with a world-class barking fit. The buck instantly stood up and walked into the deep woods without offering a shot. Since then, I’ve had innumerable stalks thwarted by these cursed tree rats, some ending entire seasons in failure by a single squirrel.

Aside from using other deer as sentinels, big bucks use a myriad of other forest creatures for safety too. As you travel through the woods you might notice that squirrels, chipmunks, and a variety of birds are continually announcing your presence. They do this to warn their own species of danger, but the deer pick up on their calls and use them to their advantage. Big bucks, especially, are completely aware of their surrounding and pick notice anything out of the ordinary.

How Deer Use Squirrels

If you’ve had the chance to observe many deer in the deep woods, then you’ve probably noticed that every time a squirrel fires up, the deer will stop whatever he’s doing and stare in that direction. Squirrels don’t bark randomly; there’s always a threat, even if it’s just another squirrel in their territory. Either way, if you agitate a squirrel, then just know that any deer within earshot is now looking for danger. Conversely, squirrels bark at deer as well as people. Several times I’ve found deer in places where I’ve heard a squirrel fire up. So don’t be afraid to investigate random squirrel barks.

Like elk, big bucks enjoy the security of bedding in thick, over-grown conifer forests. The problem with conifers is the abundance of squirrels and chipmunks that inhabit them. Like most animals, squirrels are territorial. Long ago I noticed that the whole conifer forest is gridded in squirrel territory. When you leave one barking squirrel behind, you’ll likely run into another and another as you move through the woods.

Squirrels aren’t too noisy early season, but it gets progressively worse in September as the squirrels begin to amass food stores (pinecones) for winter. In my neck of the woods, August 25th is the beginning of mayhem.

Chipmunks Too?!

If you have an abundance of chipmunks in your area, you might notice they’re equally bad, erupting with a myriad of alarming noises that deer pick up on. One time I stumbled upon a crabby 4×4 buck feeding off a trail at 15 yards. Immediately, a cantankerous chipmunk situated between us erupted into a machine gun-like, high-pitched chirping fit. The buck stopped feeding and spent the next five minutes scanning the woods for danger. Eventually he marched nervously away. Just last year my eight-hour, once-in-a-lifetime mountain goat stalk was nearly blown by a single chipmunk who threw an alarming fit in a nearby tree.

Knowing that squirrels and chipmunks are such threats to bowhunting success, what do you do? I’ve tried everything, but here are a few tried-and-true techniques that might help you.

Squirrel Avoidance Techniques

Unless you are sitting in a fixed ambush position, your best strategy is to just get up and move. Once out of sight, squirrels will soon shut up and go about their business. Fortunately, not all squirrels are bad. Some will even allow your presence, like if they’re too busy gathering pinecones to notice you.

A second option is to wait the squirrel out. Squirrels will generally bark for 30 minutes or less, during which time no deer will enter the area, guaranteed. After 30 minutes squirrels will tire out and go back to their business. Another effective technique is to walk directly towards the squirrel’s tree. Most squirrels will get nervous as you approach and shut up—but not always. Some just get louder! Fortunately chipmunks are more skittish and scare easily.

As a last resort, feel free to shoot the wretched beast. You don’t necessarily have to kill him, just whiz an arrow past his head. When he realizes he’s in danger, he’ll likely run off. For this reason, I always carry a cheap, aluminum “squirrel arrow” in my quiver—because you’re not likely to get your arrow back; believe me, I’ve shot at a lot of squirrels. My Spanish name is actually Squirlero! Okay, it’s not, but it should be.

Again, it depends on the squirrel you’re shooting at. Some just climb higher and bark louder. For this reason, a more lethal method might be in order. I know one hunter who carries a lightweight BB pistol in his pack…just in case.

Conclusion

If you hunt long enough, you’ll inevitably have an entire hunt go down the toilet thanks to a random tree rat. So be prepared by using the aforementioned squirrel-avoidance techniques. On a side note, I’ve actually eaten more squirrels than the average person. It was a long time ago, but eat them I did. They’re actually quite tasty; like chicken but with a nutty overtone. Bon appétit!

How to Estimate Distance without a Rangefinder

How to Judge Distance without a Rangefinder

To Range or Not to Range

A laser rangefinder is an absolute necessity for compound bow shooters. Whenever possible I implore you to range the distance of any animal. This is especially important over flat ground and long distances.

That being said, all bowhunters must learn to judge distance without the aid of a rangefinder. When hunting in heavy timber, bucks can appear and disappear quickly, so you need to be ready for fast action. The majority of my trophies were taken on the fly with no time to range. Learning to judge distance without a rangefinder is something that can be easily practiced at home. Here are some techniques.

Practice Makes Perfect

Set your target in the weeds at an unknown distance, and then shoot from random yardages without ranging. After your first shot, verify the distance with your rangefinder. Do this exercise at every practice session and your distance-judging abilities will increase rapidly.

When you’re hunting in the woods you can take advantage of the vast amount of downtime by guessing random yardages of distant trees or rocks, and then verifying the distance with your rangefinder. This is both a fun and productive way to kill time afield.

Another exercise is to figure out the farthest distance you can throw a fist-size rock (it’s usually 40-50 yards). In the field, ask yourself if you could hit a certain object with a rock. Your brain already knows, through muscle memory, how far you can throw a rock, so you can pretty much gauge whether or not you could hit something with a rock by just looking at it. Then use that estimation as a reference. This method is surprisingly accurate.

Judging distance can be especially difficult over longer distances and flat ground. In these situations try using the twenty-yard addition method. You already know what 20 yards looks like, so you can figure out longer distances by finding a spot 20 yards away, and then another spot 20 yards beyond that until you reach your target. Keep adding 20-yards until you reach the target. It works!

How to Find your Passion in Hunting

Be Passionate

Hunting with passion will take you farther than anything else. When the mountain is just too big and too steep, it’s not physical strength that pulls me up, but a deep-seated, burning passion that keeps my legs churning. It’s much more mental than physical.

I first noticed this back in 2015 while elk hunting with my wife. In the early light I could hear the elk herd moving farther up the mountain. My legs burned as I huffed and puffed steadily behind them. Still, I didn’t stop or rest as I was compelled with great desire to catch up to them. For a moment I felt as though I’d split in half: my boundless spirit was moving ahead of my faltering body, and then reaching back to pull my body along. It was a weird mental moment, but it got me up the mountain despite the apparent physical impossibility.

That drive comes from the hope of infinite possibilities lying ahead, or some magical opportunity lurking in the near future. Unfortunately, this “drive” is nearly impossible to teach; it has to come from within.

How to Find Your Drive

Learning to be passionately driven will bring more success than anything else, even extreme physical training. If you can learn to fan that initial flame into a burning desire, then you’ll find your passion and use it as a tool.

The best way to kindle you hunting passion is to set realistic goals, and then do whatever it takes to reach them. As you begin to  have small successes, set bigger goals. By continually striving for bigger and better bucks, your love for hunting grows forever.

Throughout this process, try focusing on the whole hunting package, not just the kill. Take time to appreciate the miracle and beauty of nature. Read and learn about the long history of the bow-and-arrow and its precious heritage down through the ages. Feel the power you transfer to the bow from your own body, and then observe the mystical flight of the arrow into the target. It’s a beautiful, artistic craft!

Be sure to immerse yourself completely into the entire hunting process, from preseason preparation to the final harvest. Try processing the animal’s sacred meat by yourself and you’ll attain a greater appreciation for the animal.

This is the recipe for passion that will drive your spirit up the mountain and towards long-term success.

Avoid Pitfalls

If however your intentions are impure; if you just want to kill something with little regard for the sanctity of life; if you’re really hunting for recognition and ego, then your passion will erode and eventually falter. As exciting as the kill might be, most people—hunters and non-hunters alike—don’t really care about your success. That is, unless you shoot a real monster, in which case they’ll just be jealous.

Conclusion

In the end if you aren’t hunting for yourself, or your family’s dinner table, then you’ll lose your passion for the sport. That’s because the mountain is cruel; it often beats you up and holds out on you. Over time you’ll grow to resent it. Finally, one day, tragically, hunting becomes too much a burden and you don’t return.

Don’t go down this route! Instead foster your passion and you’ll find success afield, whether you harvest something or not.

All the Fish in Utah: A Reel Life Goal

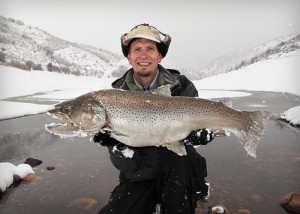
21-pound brown trout taken in 2012 from Causey Reservoir, Utah.

Preface:  Yeah, I know this is a bowhunting blog, but fishing is hunting–underwater hunting to be exact–and many of the same hunting concepts apply.

Every Fish in Utah

Way back before video games and cell phones, when I was a little kid growing up in Northern Utah, we farm kids wiled away our time in the outdoors. Some of my earliest memories were time spent trout fishing with my  family. My love for fishing continued strong into my teenage years and pretty soon I was dodging work to go fishing any time I could.

It wasn’t long before I began exploring new waters with exciting, new fish species ranging from bass, to sunfish, and weird stuff like arctic grayling and tiger musky. I guess variety truly is the spice of life because I loved catching a new fish way more than the same old boring trout.

Somewhere along my angling path I picked up a DWR fish regulation booklet in which was printed dozens of full color fish pictures. I was pleasantly surprised at just how many fish species we had living in Utah, due primarily to the wide range of temperatures and elevations this state affords. In a nanosecond I decided to catch every single fish before I died; it was my life’s goal. As an aside, I had no interest in catching the wide variety of trash fish (carp, suckers, and chubs) so I left them out.

Throughout my troublesome twenties, I systematically checked off fish after fish. It was quite the adventure. Some fish, like the white bass, pike, and tiger musky, existed in only one or two lakes, which forced me to make several surgical strikes along the way. Not only did I end up exploring countless new waters, but I was learning all about specific fish behaviors and special techniques for catching them. I talked to dozens of fish shop owners and DWR officers over the years and found the whole process to be fascinating.

Only Five to Go

As I neared my thirties, my list of remaining species had shrunk to only five species: walleye, whitefish, striped bass, and northern pike. This is where things got complicated. The DWR, in their infinite wisdom and biological prowess, began cross-breeding several species to produce entirely new species of sterile hybrids. These included tiger trout, splake, and wiper bass. It seemed that every time I crossed a fish off my list, they added a new one. It was frustrating, but fun!

The tiger trout was the craziest fish I ever met. The first one I hooked actually took of “running,” or skipping, across the lake surface. I lost several before finally landing one. There’s something about crossing a brown trout with a brook trout that brings out the crazy.

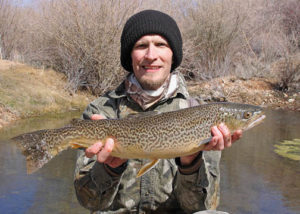
Tiger trout from Birch Creek Reservoir.

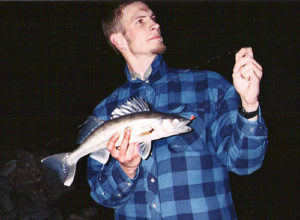
The toughest fish was the elusive walleye. This silver-eyed, nocturnal bottom-hunter exists in just a few Utah lakes, the closest being Willard Bay. For five long years I researched walleye, bought piles of walleye-specific lures, and beat the waters to death trying to catch one. I fantasized about punching the walleye in the snout if I ever did catch one. Finally, one cool and dark evening on the shores of Willard bay in 2000, I landed an 18-incher on a white curly tail jig. I didn’t punch it, but made a delicious walleye dinner instead.

Finally, a walleye! Willard Bay, 2000.

The whitefish–an ugly, bottom-feeding fish resembling a cross between a trout and a carp–fell next to my fly rod on the Weber River. One freezing, winter afternoon I bounced a nymph along the bottom and BOOM, caught and photographed a whitefish, then tossed it back. Only two fish left!

The Lowly Burbot

Nope, make that three…  Around this time, some ass-clown, bucket-biologist tossed a ling cod (aka burbot) into Flaming Gorge and it just took off. This ugly fish, which resembles a cross between a snake and a living turd, exploded in the vast waters of the Gorge and now threatens to wreck the entire fishery. Nonetheless, it was placed on my hit list. In the winter of 2011 I signed up for the Burbot Bash Fish Derby and caught an ugly burbot the first night out. I almost didn’t want to touch it, but man was it delicious!

Ling cod (burbot) from Flaming Gorge, 2011.

Only Two Left

In spring of 2011 I made a solo trip 400 miles to Lake Powell to target striped bass from shore. I’d amassed a huge pile of striper data over the years…none of which really helped me, that is, except for chumming. Shad lures were the purported ticket: buy a bunch of white and silver lures and throw ’em till you catch a striper. I chummed the water with a pile of cut-up shad pieces and then casted and reeled and casted and reeled to no avail.

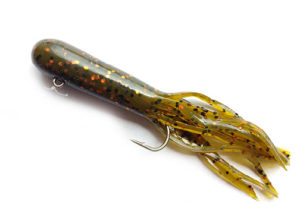
My secret weapon. DO NOT SHARE! ;>)

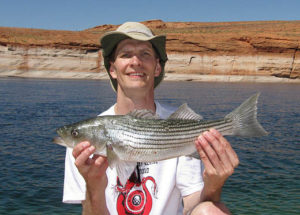
An hour later, with nary a bite, I was rummaging desperately through my tackle box when I spotted my secret weapon: a 4-inch, green tube jig with red flakes. This unsuspecting lure had caught more fish than any lure I own. In no time I was fighting a big ‘ol striper bass to shore…and then 12 more! Amazing! Only one more fish to go: the northern pike.

My first striped bass. Lake Powell, 2011.

Pike occur in abundance at Yuba Lake in Central Utah, which just happened to be on my way home from Powell. Could I actually do it???

Nope. Runoff was high that year, and the lake was flooded and freezing cold. I wandered all over the limited public access shoreline while tossing everything I had into the water to no avail. Then I went home empty-handed.

2012 was a great year, not because the world didn’t end, but rather I got several days off with my wife for a second round at the northern pike. My goal was simple: Fish all day, every day, and NEVER come home till I’d accomplished my life’s goal.

It was a warm and calm day, the 22nd of May, 2012. We loaded the old green canoe on the roof of my truck and headed south. (NOTE: You definitely need a boat when fishing Yuba. A canoe will work.) We canoed around while tossing spinners into likely pike areas…I think…though I’d never actually seen a pike in reel life. ANYHOO, I got good tug, set the hook, and reeled in a small pike, but a pike nonetheless.

Mission Accompished

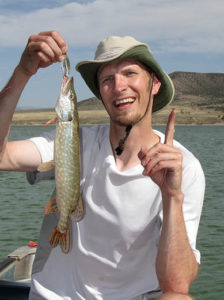
I was ecstatic! Well, I was ecstatic for about 2 minutes. After taking pictures however, a deep emptiness set in. It caught me off guard. All I could think was, “Now what!?” I guess I didn’t believe it would actually happen. Now what?

Mission accomplished!!! Northern pike at Yuba Reservoir, 2012.

After 30 years, I’d fallen in love with the chase even more than the fish. Each new species was an exciting new adventure. Countless nights I’d stayed up late studying fish behavior and learning new tactics. Each new fish was accompanied by an adrenaline surge and a great sense of accomplishment. And now it was over.

Such is life.

Now What?

I have since set newer, bigger outdoor goals. I probably won’t live long enough to reach them all, but I now understand that it’s the pursuit I love most. Moreover, it’s the people who support your goals and accompany you on your crazy adventures. (Special thanks to my wife, Esther, who supported me whole-hardheartedly through my mad, mad life.)

Without goals we flounder through life and get lazy. Mediocrity sets in. Give me adventure, give me passion, give me conquest, or give me death!

Conclusion – The Art of Zen Fishing

The most valuable single piece of information I gained from my quest is fish Zen. No matter where I fish, I can pretty quickly get a feel for when, where, and what the fish are biting on. As my lure moves through the water I can almost visualize where the fish are and how they’ll respond to it. Infinite knowledge and experience is archived in my subconscious and conscious mind. I make my next cast and retrieve based not on speculation, but infinite data points, some of which I’m not even conscious of. What does it all mean? I’ll never starve. There’s a simple, primal, and invaluable confidence in knowing that you’ll never starve.

Now It’s Your Turn

Now it’s your turn, if you so desire. Utah has 30 game fish species strewn all over the state, and I’ve never met another person who’s caught them all. Close, maybe. So why not try it yourself! Send me any questions you may have and I’ll be glad to help you out. Truthfully, I’m sitting on way too much fishing information to just take it to my grave.

Happy Fishing!

Hunting Pillars vs. Zen Hunting Pillars

The Pillars of Hunting vs. Pillars of Zen Hunting

A few years ago I was fish-guiding a bright, twenty-something-year-old man named Cliff. He was eager to fish, but just as eager to converse about the wonders of nature. Throughout our impassioned conversation I laid out some personal Zen-like experiences I’d had in nature and how these experiences ultimately led to great success.

Cliff was fascinated with the concept of Zen hunting and asked me what the “pillars” of Zen hunting were exactly. I was a little dumbfounded by his question because, up until then, I’d never thought of Zen hunting in terms of ‘pillars.’ Long story short, I went home wrote down what I considered the pillars of Zen hunting to be.

Before we get all philosophical about hunting, let’s first examine the normal, non-Zen, hunting pillars, and then contrast them with Zen hunting pillars.

Note: The following isn’t an official list of hunting pillars, but rather a compilation of both personal experience and knowledge gleaned from experts in the hunting field.

Traditional Hunting Pillars of Success

  1. The right equipment
  2. Good physical conditioning
  3. Locating/scouting
  4. Stalking close
  5. Shooting accurately

Zen Hunting Pillars of Success

  1. Aloneness (quietness)
  2. Patience
  3. Letting Go
  4. Openness (humility)
  5. Oneness

(There you go Cliff! The pillars are finally written in stone.)

Hunting Pillars Compared

When we compare the pillars of Zen hunting with the pillars of conventional hunting, you can see they are very different; actually I don’t see any similarities at all. That’s because each list is a completely different approach to hunting. The items in the first list are mostly tangible and readily available, while the Zen items are more of a mindset approach to hunting. As we analyze the Zen pillars, you’ll see that each is really a step—one leading to the next—and completed in consecutive order. In other words it’s a path.

Obviously you can’t practice Zen hunting without including some normal hunting pillars, like stalking and shooting. On the other hand, you can practice regular hunting without using any Zen pillars at all—heck, most hunters already do. Either they don’t know what Zen hunting is, or they’re already applying some Zen to their hunting style and just don’t know it.

The concept of Zen hunting (or Zen-anything) is mostly foreign to Westerners because we tend to be results-oriented and gear-minded. We look at nature as a commodity—something to be tamed or dominated. Moreover, today’s society has a decreasing attention span, the byproduct of this hyper-information age and its constant distractions. We get bored easily and lose our focus. All of this leads to an impatient or aggressive approach to hunting, and more often than not, to failure.

The way we combat this is through Zen hunting. Zen hunting is all about using down time afield to focus the mind and reconnect with our natural hunting instincts. This is best done alone since another person often serves as a distraction.

The Zen Process

The first step is to free the mind of distractions and expectations through the natural mediation that comes from just sitting or walking in the woods. This takes time, so be patient. Letting go of expectations is the hardest part because human nature expects instant results. As hunters we expect to kill something. We have a goal in mind and are dead set on reaching it. In Zen hunting, our eyes are open to the bigger picture.

The simple pleasure of communing with nature is satisfaction enough. Our newfound appreciation for the woods softens our kill drive, and when this happens we connect with the energy of nature and the life force of the planet (hopefully you believe in such things). This is what it means to be “one” with nature, or to achieve “oneness.”

Nature lives and breathes at a slow, rhythmic pace. You can see that rhythm in the way things move: clouds, trees, and animals, and hear it in the wind and bird songs. Zen hunting helps tune us in to that rhythm. No longer do we push our ego-driven “kill energy” ahead of us, but instead, we move with nature. In effect Zen hunting acts as a natural camouflage.

Zen hunting also gives us a heightened sense of awareness. We become more attentive to the infinite supply of subtle clues which will eventually guides us towards our quarry. Simply put, we become better hunters by using Zen afield.

That’s the whole process; easier said than done, but attainable all the same.

Final Thoughts

The goal of Zen hunting is to become a part of nature rather than apart from it. Since humans are nature in the first place, it only makes sense to reconnect with Nature to meet our needs. That is the goal of Zen hunting, and also the mission of this website: To reconnect modern-day hunters with the timeless rhythms of nature and to guide them towards a more successful and fulfilling hunting experience through Zen hunting principles.

Always Pull Another Arrow


Always Pull Another Arrow

This is one little–but all-too-important–hunting skill that bow hunters should be practicing. It might seem intuitive that, immediately after your first shot, you should be pulling and loading another arrow. But it’s not.

The wait-and-see approach can make all the difference between success and failure. This is why you hear guides on hunting shows always pleading, “Shoot again, shoot again!”

Bow hunting is different than gun hunting insomuch that the animal often doesn’t realize you’ve shot, especially at longer distance where he doesn’t hear the shot. Sometimes the animal doesn’t even know he’s been hit, which can afford you a follow up shot!

Hit or miss, your non-bow hand should be immediately grasping and loading another arrow. It’s one of those skills that’s acquired over time through real-life hunting experiences, but rarely practiced.

Now, I don’t want to pick on my wonderful bowhunting wife, but here’s a classic example:

On our first archery turkey hunt, we called up a group of mature toms. Forever they gobbled while cautiously circling us, so we moved in on them. When the biggest tom broke the treeline, I whispered the yardage and Esther let an arrow fly…and missed. The tom jumped, then meandered off. Desperately I whispered, “Shoot, SHOOT!”, but when I turned around, I saw that Esther hadn’t loaded another arrow. What seemed intuitive to me was not intuitive to a newbie-hunter.

Practice Makes Perfect

To avoid this mistake I recommend incorporating a simple shoot-and-pull technique into your regular practice routine. Note: It’s best to use a real-life 3D animal target to help train your brain for real-life scenarios. Here’s how it’s done:

  1. Shoot your first arrow. Hit or miss, you have five seconds to…
  2. Pull, load, and shoot a second arrow.
  3. Repeat.

Pretty simple, huh? Given enough time afield, I guarantee that practicing this technique will one day save your hunt. Hit or miss, having a second arrow ready can make all the difference between success and failure.