Tag Archives: equipment

How to Choose a Compound Bow for Hunting

Compound Bow Considerations

Compound bow technology has come a long way in just the last few decades. The brand of bow doesn’t really matter much anymore because any bow manufacturer still in business has to work hard to keep up with advancements in efficiency and reliability. Some of the more popular bow manufacturers include Mathews, Hoyt, Bowtech, PSE, Bear, Prime, Elite, and a few others. In this article we’ll look at the most important considerations when purchasing a new or used compound bow.

Compound Bow Price

You can expect to pay well over $1000 for brand new bare bow. If you’re on a budget you might consider a lightly used bow for half the cost of a new one. When parallel limb technology took off in the mid-2000s, bows became much quieter and more efficient. Therefore, any used compound bow manufactured after 2008 or 2009 should work fine, so long as it hasn’t been damaged in some way. Over the years I’ve bought a few great used bows on EBay or local classified ads. Older bows from the 80s and 90s with vertical limbs and round cams are much less efficient and noisy. This often results in animals jumping the string.

Compound Bow Cams

Modern compound bows are powered by either single or dual cams. Basically, single cam bows are easier to tune than dual cams. The major drawback to single cams is that they produce slower arrow speeds than dual cams. Dual cam bows (aka speed bows) are faster, but more difficult to tune because, a) both cams must roll over in perfect synchronicity, and b) extreme arrow velocity accentuates imperfections in shooting form, bow tuning, and broadhead design.

Tuning issues have been largely reduced in newer bows, but in my experience dual cam bows are still harder to tune. This has more to do with blistering arrow speed than bow tuning. The faster an arrow flies, the more it is negatively affected by poor form or wind planing.

There are two major factors to consider when choosing a compound bow: Draw length and draw weight.

Draw Length

Draw length is basically the distance from your extended palm to your face. The easiest way to measure your draw length is by holding a yardstick in your palms straight out from the base of your throat, and then measure the distance to the tips of your middle fingers. Alternatively, you can measure your wingspan by holding your arms straight out and measuring the distance from the tips of your middle fingers. Then divide this number by 2.5.

The draw length of your bow needs to be within half an inch of your measured length. You can get away with a slightly shorter draw length, but if your bow’s draw is too long it will throw you off balance.

Draw Weight

As for draw weight, you should pull as much poundage as you are comfortable with without straining your shoulders or fatiguing out after a few shots. Drawing a bow that’s too heavy can also lead to shoulder injuries that will shorten your bowhunting career.

Also, if your bow is too heavy it can be impossible to draw back when you are cold or fatigued. This is something I’ve experienced personally while hunting in wintertime. That being said, a bow that’s too light won’t transfer enough energy to the arrow and will result in wide sight pin spacing and less accuracy. It can also result in less penetration or pass-through shots.

Carry Weight

Aside from draw weight and length, the bow’s carry weight should be considered. As they say, “a heavier bow is a steadier bow.” However, an extreme backcountry bowhunter might consider a lightweight carbon bow. Carbon bows are more expensive than aluminum, but weigh as much as a pound less. If you are stuck with an aluminum bow you can always reduce weight by choosing lightweight accessories made from carbon fiber or other composite materials. My current hunting bow is aluminum, but I keep it light by using a composite quiver, stabilizer, rest, and bow sight.

Bow Height

Another consideration when purchasing a compound bow is the axleto-axle length (or ATA). If you have a long draw length—basically anything over 28 inches—a longer axle-to-axle bow is more forgiving of form issues because it has a wider string angle. The only drawback to tall bow is when hunting in wide open or low brush country where a taller bow will be more visible as you raise or draw your bow. Unless you have a very long draw length (say, 30 inches or more), I recommend a shorter ATA between 28-30 inches.

Final Thought

No matter what bow, arrow, and broadhead combination you shoot, just remember that shot placement is more important than speed or anything else. You don’t need a pass-through shot to drop a big animal. If your arrow is placed in the right spot, then speed and kinetic energy are secondary factors.

Extending Your Effective Range

Extending Your Effective Range with Compound Bows

Let’s say you’ve mastered the fundamentals of archery, but you’re stuck with an effective shooting range of 50 yards. Any farther and you begin to miss the 9-inch bullseye. At this point, how do you extend your range?

Extending your effective range starts with shooting a flatter arrow trajectory (reducing the arc of the arrow). There are only three ways to do this.

#1.  Increase Draw Weight

First, you need to transfer more energy to your arrow by increasing your bow’s draw weight. Assuming your bow isn’t maxed out already, you can increase draw weight by simply tightening down the limb bolts. Depending on your bow, this will increase draw weight by 3-4 pounds per full turn. Just be sure to tighten both limb bolts equally or it will mess up your tuning.

#2.  Reduce Arrow Weight

The second way to flatten arrow trajectory is by reduce your arrow weight. This should only be considered if your arrows are already overweight for the game you’re hunting. For example, you wouldn’t want to go below 400 grains (total arrow weight) for deer, or 450 grains for elk. If you’re strictly a target shooter, then you can go as light as you want. However, going too light can be hard on your bow because not enough energy is transferred to the arrow.

Now, the only way to reduce arrow weight is by using lighter points, lighter fletchings, and/or shortening your arrows. In most cases it would be best to start with a brand new set arrows from your preferred manufacturer. Look for an arrow with a low GPI (grains per inch). Lighter arrows are generally rated around 8.0 GPI or less.

#3.  Super Tune Your Bow

The third way to flatten arrow trajectory is by super-tuning your bow. Tuning improves arrow flight by removing slight deviations  in your setup, resulting in more efficient arrow flight. The longer it takes for an arrow to straighten out in flight, the more energy is lost due to air friction. Too much wobble also decreases arrow penetration.

Super-tuning starts with a good paper tuning. This involves adjustments to your arrow rest and/or nocking point. Throughout this process you may need to adjust your bow’s cam timing or cam lean. These adjustments require the use of a bow press, so unless you have the one it would be best left to a professional.

Additional Methods

Aside from flattening your arrow trajectory, there are a few other ways to increase accuracy. They include:

  • Regularly practice shooting at very long distances. This makes shorter distances much easier.
  • Practice “surprise release” drills. This is especially important for people struggling with target panic.
  • Shoot smaller diameter arrows that are more wind resistant.
  • Consider using a one-pin sight. Single pin sights provide better target visibility, especially at longer distances.
  • If you are shooting an older bow, consider upgrading to a newer, faster bow, preferably with two cams. Single-cam bows tend to shoot slower because they don’t transfer as much energy as modern two-cam “speed bows.”

Conclusion

There you have it, everything you need to expand your effective range. With today’s fast-shooting, dual-cam bows you don’t have to sacrifice speed or energy to get a flat-shooting arrow. Just make sure your bow is finely tuned.

When it comes to hunting, shot placement is more critical than speed or kinetic energy. Shot placement means putting the arrow in the precise kill zone for maximum damage.

Above all, make each arrow count during your practice sessions. Always shoot for quality over quantity.

Field Care: Quartering and Packing

Packing out a heavy mule deer.

Quartering and Packing

In the old days hunters often avoided hunting too far from roads simply because it would be too difficult to drag the animal out if they got one. A lot has changed since then. Today, backcountry hunters quarter or bone out their meat and then pack it out in a trip or two.

Quartering means removing the skin, all four quarters, the back-straps, and whatever other parts you wish to keep, including the ribs, neck meat, liver, heart, etc.

Boning means removing meat from the bones. Boning reduces pack weight by several pounds, but this method has its drawbacks. First, boning takes time to do it correctly. Secondly, it exposes even more meat to contamination from dirt, bugs, and hair. For this reason I advise against boning meat unless absolutely necessary.

Quartering and hanging an animal is much more sensible than gutting and dragging the animal out whole. A boned-out mule deer weighs about 90 pounds and can be packed out in a single trip if necessary.

An elk is about 3.5X larger than a deer. Boned or not, an elk will take two people several trips to pack it out. Whatever the case, just be sure you have an exit plan before launching an arrow.

The basics of quartering big game can be learned from numerous video tutorials found online. Then it’s just a matter of practice.

Quartering can be a daunting or even dangerous task when performed alone, especially on slippery or uneven terrain. Until you’ve gained some experience, try to enlist some help from fellow hunters for tasks like holding legs and hanging quarters. With a little practice, it can be accomplished alone.

Temperature and Spoilage

Heat is the number one concern with meat care. Bacteria grow  exponentially on a carcass if allowed to stay warm too long. Meat begins to spoil in temperatures above 40 degrees (fridge temperature). In 90-degree weather—which coincides with many archery seasons—meat can spoil in single a day.

The higher the ambient air temperature, the greater chance of spoilage. Ambient air temperature determines how much time you have to get quarters packed out and loaded into coolers.

When daytime temperatures are above 70 degrees, the animal should be packed out within 24 hours. If daytime temperatures are  below 50 degrees, you can take your time, even several days if needed.

Other than rapidly cooling your meat, there are a couple additional ways to extend meat freshness. First, there’s a company out there that makes anti-microbial game bags. These bags can help slow bacteria spread on the surface of the meat where most  contamintatin takes place. Second, when flies are an issue, simply rub black pepper all over the surface of the meat.

Quartering Tools

Be sure to carry the right tools for quartering your animal. This includes a very sharp hunting knife with a built-in gut hook, a lightweight folding bone saw, a knife sharpener, and a 4-pack of lightweight game bags.

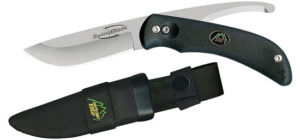
My favorite knife for skinning is the Outdoor Edge Swingblade. The locking blade converts to a dedicated gutting knife. Besides gutting, this extra blade easily unzips the hide and cape without cutting too much hair.

Outdoor Edge Swingblade skinning knife and gutting blade.

Some hunters prefer razor knives with replaceable blades like the Havalon models. Havalons are extremely sharp and capable of breaking down even the largest animals. But they aren’t ideal for skinning as they can easily cut through the hide.

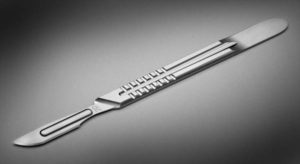
I personally carry a small surgeon’s scalpel with cheap replaceable blades and use it in conjunction with my skinning/gutting knife. The scalpel is especially useful for caping and removing the hide from delicate facial areas.

Lightweight surgeon’s scalpel w/ replaceable blades.

Cooling Your Meat

The first step in cooling meat is to open the chest cavity and use a stick to spread the rib cage apart. Next, skin the carcass as soon as possible. The hair and hide is very good at insulating and will hold heat for a long time. An elk carcass left with the hide on can spoil even when left lying on snow.

Skinning is best accomplished systematically as you remove quarters if you’re using the “gutless method.” (See YouTube for videos on the gutless method). In this fashion, the hide is left intact and spread out on the ground as a barrier between dirt and the meat.

Once quartered and bagged, hang the meat in the shade to cool. Either hang the quarters in a tree or prop them up on rocks, logs or bushes to increase air circulation. Even in hot weather, meat will cool rapidly in the shade and will extend pack-out time.

Whenever possible hang the meat in the bottom of a valley and/or near a stream to cool overnight.

You can further cool meat by placing pre-cooled quarters in plastic garbage bags and securing the bags in a stream or river. Just make sure the sun isn’t hitting the bags as they can heat up even when submerged.

Finally, consider packing the meat out at night as this can keep both you and your meat from overheating.

Once the meat is hung you will need to figure out how many pack-out trips it’s going to take. This depends on your physical conditioning, distance, and terrain. Try to figure out how much weight you can safely carry long distances before going afield.

When dealing with trophy animals, the head, antlers and hide will add significantly more weight. You can always remove the antlers and cape from the head in the field, but take extreme care. Without adequate caping experience you could easily damage or ruin your trophy cape.

Using Pack Animals

Whenever possible try to enlist a number of friends and/or pack animals for the job. With today’s lightweight frame packs there’s practically nothing you and a couple buddies can’t pack out given enough time. The problem with backcountry hunts is that you may not have enough time to get the animal out before it spoils. This is where pack animals come in handy.

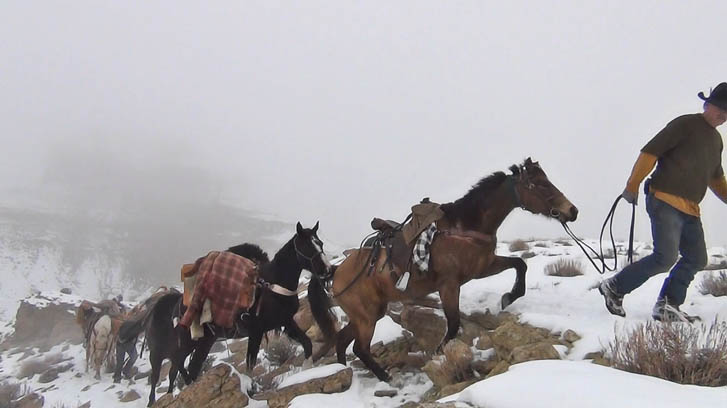
For backcountry wilderness hunts, consider hiring a horse packer. My brother once harvested a 2000 pound bison at the bottom of a snowy chasm. Retrieving his once-in-a-lifetime animal was only made possible by hiring a horse packer. It costed several hundred dollars, but was well worth the expense.

Horse packers with bison.

Another option is renting llamas or pack goats. My brother has a string of pack goats that have proven invaluable for packing elk out of the backcountry.

Having a couple horses will open up the vast wilderness to more hunting opportunities. Legendary trophy hunters like Kirt Darner and Robby Denning frequently relied on horses, not only for access, but for getting their trophies out of the backcountry.

The biggest drawback to owning pack animals is the year-round expense and maintenance involved, not to mention the burden of caring for them afield. But in my opinion, these trade-offs are tolerable if it means consistent success on trophy bucks.

Conclusion

It’s much easier to spend a couple extra days packing a critter out of some hell hole than hunting easy-access country for weeks on end without success. You just need to have an exit plan. This means being in good enough shape for an arduous pack-out, or using pack animals for the task.

Carbon versus Aluminum Compound Bows: Pros and Cons

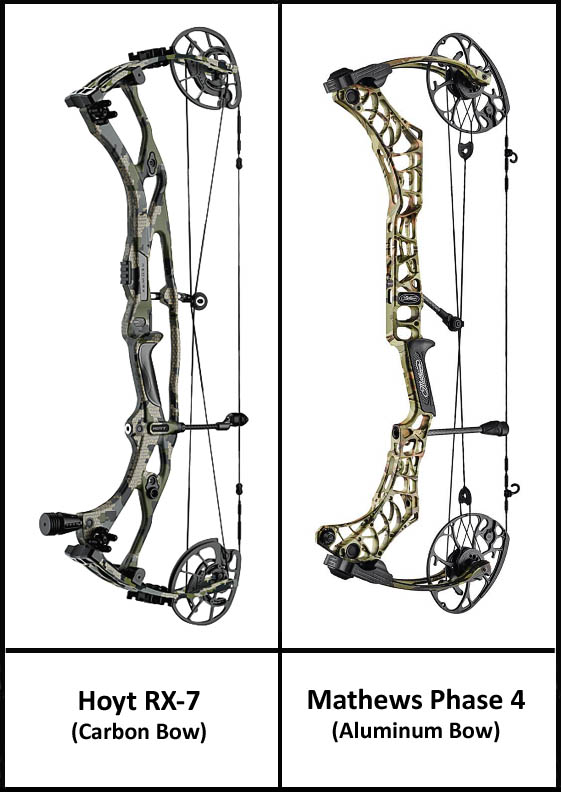
2023 model bows from Hoyt and Mathews.

Carbon vs. Aluminum Bows

If you are in the market for a new compound bow, one of the first things to consider is carbon or aluminum. There’s a pretty even split between hunting camps about which is better. In this article we’ll contrast the pros and cons of each bow type.

Let’s first take a look at carbon.

Carbon fiber bows aren’t really all carbon; just the main handle section, or riser, is carbon. The limbs are made of a variety of high-tech materials not relevant to this topic. Carbon fiber is very strong, stable, and lightweight which makes a perfect platform for anything from bikes to bows.

Advantages to Carbon Bows

The greatest advantage to carbon is that it’s lightweight, yet very strong. On average, a carbon bow weighs about a pound less than an aluminum bow. Aluminum is relatively dense and heavy. The only way to make aluminum lighter is by making it thinner, but that also makes it weaker. Aluminum bows aren’t really weak; they’re just not as tough as carbon.

Carbon bows are ideal for backcountry bowhunters who count every ounce. Lugging a heavy aluminum bow laden with arrows into extreme country can be a hindrance. And since carbon bows are stronger, they can stand up to more abuse in the backcountry. Another nice thing about carbon is that you can easily add more stabilizer weight to make it heavier, if you so choose.

Another advantage carbon has over aluminum is that carbon stays warm to the touch. The handle of an aluminum bow can become unbearably cold in freezing conditions. It’s not a big deal if you shoot with gloves on, but wearing thick gloves can be problematic and cause side-to-side torque issues.

Advantages of Aluminum Bows

First off, if you’re on a budget, aluminum might be your only option. Carbon bows run about 30-40 percent more expensive than aluminum bows. This averages around $500 difference. Higher end aluminum models list around $1200 whereas carbon bows hover around $1700. Currently, the most expensive hunting bow costs around $1800, and is made by Hoyt.

There are also more aluminum bows on the market than carbon bows. The whole carbon fiber manufacturing process is very expensive. Some bow manufactures don’t even make carbon bows simply because there’s a high enough demand for their aluminum offerings, and so they don’t need to invest in the expensive carbon technology.

Because aluminum is denser than carbon, aluminum bows tend to  have less vibration or “hand shock.” Fortunately excess vibration has been reduced in newer model carbon bows. Still, some hunters prefer a heavier bow. Simply put, a heavier bow is a steadier bow. Heavier bows are also less affected by crosswinds.

If you like aluminum bows but hate the weight, you can always replace the standard accessories (stabilizer, sight, quiver, and arrow rest) with carbon or composite materials. However, you’ll still be limited on how much you can ultimately reduce overall weight.

Pros and Cons Overview:

Carbon PROS

  • Lighter than aluminum
  • Stronger riser
  • Warmer to the touch

Carbon CONS

  • More expensive
  • More vibration
  • Less carbon bow choices

Aluminum PROS

  • Less expensive than carbon
  • Less bow vibrations
  • More bow choices

Aluminum CONS

  • Heavier than carbon
  • Cold in winter conditions
  • Not as strong

Conclusion

There is no right or wrong bow; both carbon and aluminum bows have their pros and cons. What it really boils down to personal preference.

If you prefer a lighter bow, carbon would be a better choice. If you’re on a tight budget, aluminum might be your only option. Maybe you just like the look and style of one bow over another. If you still can’t decide, just head to your local archery shop and see which one shoots and feels best in your hand.

Why I Switched BACK to a Fixed Pin Bow Sight

Why I Switched BACK to a Fixed Pin Bow Sight

In 2016 I switched from a fixed pin sight to a one pin “slider” sight. That year I harvested a bear, deer, and an elk. I was sold on a one-pin sight, and for good reason. (Here’s the link to that article).

Then, in 2017, halfway through the deer hunt, my slider broke. The gears simply stripped out. Thankfully I had my backup bow in camp and was able to swap back to my old multi-pin sight.

When I got home I bought a slider sight and used it for a while, but it didn’t stick. Eventually I went back to my fixed pin sight and never looked back. In this article we’ll look at the pros and cons of using a fixed-pin (multi-pin) bow sight.

My TruGlo fixed-pin, composite bow sight.

Fixed Pin Sight Pros:

  • Fixed pin sights work with all bows and draw weights. But lower poundage bows aren’t always compatible with sliders. Especially at longer distances (usually over 60 yards) the sight housing adjust lower and lower until it actually comes into contact with the arrow or fletchings. What good is a single pin sight that can’t be dialed over 60 yards? This was the main issue I had while using a single-pin sight on my 60-pound hunting bow.
  • Unlike single pin sights, multi-pins don’t require extra hand movement when adjusting for moving targets. One-pin sights are great for stationary targets, but in the thick stuff you have to be ready for anything. Once you draw your bow, it’s not possible to readjust the sight if the animal moves, especially if it’s moving rapidly toward or away from you. Animals that move a lot—like bear, javelina, and turkey—are especially problematic with one pin sights. When hunting open terrain or when dealing with longer yardages—say 40 yards or more—movement isn’t a big issue because the animal is less likely to notice.
  • Fixed-pin sights don’t have moving parts. Once you’re sighted in, you just tighten down the screws and go. Moving parts can wear out or break easier than stationary parts. That’s what happened to me; my slider simply stripped out from normal use. And on a hunt no less! This is not acceptable.
  • Fixed-pin sights tend to be lighter than single pin sights. Slider sights with lots of working parts tend to be heavier than fixed pin sights. Of course accessory weight isn’t a big issue unless you’re already lugging around a heavy aluminum bow, or if you’re a backcountry bowhunter where weight is always an issue. Both apply to me, so using a lighter sight is better. My bare bow already weighs nearly 4.7 pounds, so accessory weight is a real issue. BTW, my favorite lightweight sight is the TruGlo Carbon XS Xtreme carbon-composite bow sight. At 4 ounces it weighs half as much as my old slider.

Now for the cons.

Fixed Pin Sight Cons:

  • The pins in a fixed sight take up more space in the sight picture. A long row of pins is not only distracting, but can block much of an animal’s vitals. It’s much easier to place a single pin on a small target than to wade through multiple pins, especially in a high-stress situation. However, using smaller diameter pins (.019 or smaller) mostly solves this problem
  • Shooting between the pins (aka pin gapping) takes practice. If you’re shooting heavy arrows and/or pulling a light draw weight, the pins on a multi-pin sight will be spaced widely apart. So shooting odd-yardages means shooting between the pins. This takes some practice to get use to. It’s much easier to just dial up the exact yardage and hold the pin on the target.
  • Selecting the right pin under pressure can lead to mistakes. This was the reason I switched to single pin sight in the first place. It’s rare that I select the wrong pin, but it can happen. And the more pins you have, the easier it is to make mistakes. That being said, mistakes are just as common with a slider sight. Anyone who has used a slider will admit to forgetting to move the pin from time to time. Mistakes happen with both sights.

Conclusion

There are pros and cons to using single- or multi-pin bow sights. The decision should be based on the type of hunting you do, your personal bow setup, and most importantly the sight you’re most comfortable using in real hunting situations.

In tournament or target shooting, I prefer a slider. In open country where long shots are the norm, I would definitely go with a slider. But in heavy cover or backcountry use, I’m more comfortable with a multi-pin sight.

Six years ago I swore I’d never go back to a fixed pin sight, yet here I am. What’s the lesson here? Never say NEVER.

Ode to My Bow

Ode to My Bow

My bow is my best friend and woods companion. It goes everywhere that I do, sometimes for weeks at a time. It hangs freely from my fingertips, never strapped to my back. It’s tough being my bow, constantly getting banged up and snagging on brush. Sometimes I break parts off of it, but it never complains or fails.

My bow has seen the most amazing things: Trophy bucks beyond imagination, breathtaking sunrises, the glowing Milky Way galaxy on a moonless night. It once protected me from a man-stalking cougar. Another time it was nearly struck by lightning as it hung from my hand during a freak thunderstorm. And yet another day, me and my bow were caught in a freak wind storm that blew down eleven trees into flying splinters around us with nowhere to run.Over the course of a year my bow gets soaked by rain, covered in dirt, and caked with snow. Despite the elements, my bow is 100% accurate with every shot. Whether it’s 100 degrees, or well below zero, my bow always shoots true. When an arrow misses the bullseye I only have myself to blame.

My bow is absolutely quiet, even when it snaps off an arrow at 300 feet per second. A deer might hear the arrow whiz by, but not the whisper of the bows release.

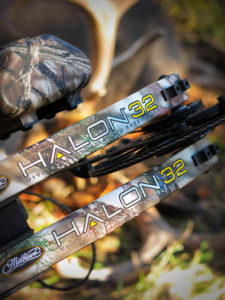
At first glance my bow looks like any other aluminum-framed, modern compound bow. But it’s not. My bow was designed by a certifiable genius-engineer by the name of Mathew McPherson. Since the 1990s, McPherson has led the charge in bow technology, quite literally reinventing the modern compound bow over and over again.

The name stamped on my bow is Halon 32. Halon is a fire-extinguisher gas and a strange name for a bow. Its actual name—the one I gave it—is “Excalibur III”.

Excalibur III is my third serious hunting bow. But in the end it’s still only a tool, and so I usually just call it, well, “My Bow.”

Since 2017 my bow has killed three P&Y deer, one trophy mountain goat, three javelina and several non-trophy animals. It’s the primary provider of meat for me and my family.

Shortly after returning home from a long hunt, I feel an emptiness by my side, like I’m forgetting something. Then I realize it’s my bow, now tucked snuggly away in its case on the floor behind the couch.

Out of sight, but never out of mind, my bow is a warrior and a friend. With my bow, alone, I share life’s greatest moments; my pain, my success, my tears and my glory.

Bow Accessories: Moving Parts vs. Fixed

Bow Accessories: Fixed vs. Moving Parts

When it comes to modern bow accessories, your options are unlimited. Some parts move–like slider sights and drop-away rests–and some are fixed–like stabilizers and quivers. Today we’re going look at the potential drawbacks of having moving parts on your bow setup.

I’ve tried a myriad of accessories in my time, but last season really forced me to reconsider some of my choices. Here’s what happened:

In 2017 I got a brand new, high-performance speed bow to replace my old single cam bow. This new “speed” bow shot field points wonderfully. Then, about a week before the hunt, I screwed on my time-proven broadheads and they flew all over the place! After many fruitless hours of trying to re-tune the bow, I gave up and switched to mechanicals. And all was well…until…

Half-way through my deer hunt–and 300 miles from home–I was taking some practice shots at camp when my slider sight stripped out and no longer functioned. Try as I might, I couldn’t fix it. Fortunately I had an old multi-pin sight on my backup bow. I bolted it on and all was fine.

But this got me thinking…

Since its invention in 1969, the compound bow–and every accessory that can be attached to it–has been reinvented or re-engineered over and over again. The old “stick-and-string” has become an extremely complicated instrument of death…which is good…but maybe too good. Why? Because the more complicated something is, the more can go wrong.

Bow Accessories to Consider

In this article I’m going concentrate on the four major moving parts of your bow setup that you may want to reconsider before heading into the backcountry:

  1. The Arrow Rest:  There was a time when the arrow rest was just a shelf cut into the bow. Before that, it was your knuckle. Now it’s up-and-down-swinging tuning fork contraption tied to a buss cable. Almost every bowhunter I know uses one. But not me; I use a Whisker Biscuit. The Whisker Biscuit is a shoot-through containment rest (aka capture rest). It bolts into position and holds your arrow securely in place. Unlike popular drop-away rests, the Biscuit has no moving parts. The arrow simply shoots right through it. The only drawback is an infinitesimal reduction of arrow speed caused by friction between the arrow vanes and the whiskers. I use the Whisker Biscuit because it’s reliable and simple. It’s also inexpensive; about half the cost of a decent drop-away rest.

    The time-proven Whisker Biscuit.
  2. The Bow Sight: You have two options: Fixed pins or movable pins (aka slider sights). I used a fixed pins for twenty years, and then one day I fell in love with the slider sight. The slider sight was simple: one movable pin that doesn’t block your target. You just dial up the yardage and shoot. Then one day my slider broke right in the middle of my hunt! Now I’m back to fixed pins. I sure like the idea of a slider sight–and may go back to it someday–but for now I’m sticking with the multi-pin.
  3. Bow Cams: Almost every modern bow is powered by either single cams or dual cams. Cams are the power engine of your bow, so this is a major consideration when choosing a bow. Basically, single cam bows are more simple and easier to tune than dual cams. The major drawback to single cams is they produce a slower arrow speed. Dual cam bows (aka speed bows) are faster, but harder to tune because, a) both cams must roll over in perfect synchronization, and b) the extreme velocity of the arrow accentuates slight imperfections in bow tuning, broadhead design, and shooting form. These days bow manufacturers claim to have conquered tuning issues by tethering the dual cams, but in my experience dual cam bows are still more difficult to tune. I’m sure it has a lot more to with blistering arrow speed than tuning, but just remember, accuracy suffers when adding extra speed. This leads us to broadhead selection.
  4. Broadheads:  Almost all broadheads fall into two categories: Fixed blade or mechanical (aka expandable). Simply put, mechanical blades fold into the tip during flight, and then expand on impact. Because the blades are hidden, they are less affected by wind resistance and planing. Thus, mechanicals are more accurate than fixed broadheads, especially on speed bows. The major drawback of mechanicals are twofold: a) more moving parts make them susceptible to breakage on impact, and b) less penetrating power due to energy loss during blade deployment.
    Mechanical vs. Fixed broadheads

    Fixed blades are inherently stronger and have better penetration than mechanicals. However, they can be difficult to tune with modern speed bows. The most important factor in choosing a broadhead is how well it shoots through your bow. Personally, I prefer fixed blades with my single cam bow and mechanicals with my dual cam bow. FYI, the most accurate  fixed-blade broadhead I’ve ever used is the Trophy Taker Shuttle T, and my favorite mechanical is the Rocky Mountain Warhead. Note: the Warhead is extremely reliable and inexpensive (only $19.99 per 3 on Amazon).

Conclusion

Compound bows are much more complicated than they used to be, which is good and bad. Bow manufacturers tout speed as their primary selling point, but faster bows aren’t necessarily more accurate. The same concept applies to arrow rests, bow sights, and other accessories. Newer isn’t always better.

When it comes to equipment selection, I recommend keeping it simple. And when it comes to moving parts, less is more.

Consistent success afield comes from skill and woodscraft, not gear. As always, I recommend focusing more time and energy on the process and less on equipment.

Good luck!

Why I Switched to a Single-Pin Slider Bow Sight

Montana Black Gold Ascent single-pin “slider” sight.

Why I Switched to a Single-Pin Slider Bow Sight

Watching my arrow sail harmlessly over a world-class buck at 50 yards wasn’t heartbreaking; it was traumatizing! After replaying the shot over and over for a year, I concluded it was either an error in ranging, or more likely I settled the wrong pin due to buck fever. Consequently I made some drastic changes to my bow setup last year, starting with my bow sight.

Standard multi-pin bow sight.

For years I used a standard multi-pin, fiber-optic bow sight. When the single-pin (slider) sight came out, I wrote it off as just another unnecessary gadget that would likely introduce more problems than anything. But after carefully weighing the pros and cons, I decided to try it–and I’ll NEVER go back. Here’s why:

Single Pin Pros

1) It’s far easier to focus a single pin on a small target than to wade through multiple-pins–or worse yet, shooting between the pins–especially under high stress.

2) Multiple pins–whether 5 or 7–take up way too much space in the sight picture. A long row of pins is not only distracting, but blocks much of the target or animal’s vitals.

3) If you’re shooting heavy arrows and/or pulling a light draw weight, the pins on a multi-pin sight will be spaced widely apart. This adversely affects accuracy. A single-pin sight that can be dialed to the exact yardage has proven to be far more accurate in my experience.

Single Pin Cons

1) The most obvious drawback to a single-pin sight is that every time the animal moves, you have to re-adjust the sight. If the animal moves quickly, or is moving away or towards you, it can be very frustrating. But after actually using it in the field (and arrowing three animals in 2016), I realized just how rare these scenarios occur. In most cases you’ll have plenty of time to re-range the animal and move the slider; it only takes a second.

2) Moving a single-pin sight creates extra movement. Again, this proved to be a nonfactor. When hunting in thick timber, I leave my pin set at 20 yards and don’t worry about it. If an animal busts out at 25-30 yards, just hold a little higher. When I’m hunting more open terrain I leave the pin at 30 or 40 yards, but it really doesn’t matter because animals that far out are usually calm and won’t notice the slight movement of my hand. After all, just drawing your bow creates far more movement than scrolling a slider wheel.

Final Note

Just about every archery accessory manufacturer makes a single-pin sight now. My only recommendation is buy a sturdy, all-aluminum model that can stand up to the rigors of hunting.

If you’re not ready to commit to a single-pin sight, then you should consider a hybrid sight. In a hybrid sight the top few pins are fixed, but the bottom pin is movable. This solves most issues listed above, but again, you still have multiple pins blocking the target. My advice is to keep it simple: one pin, one mountain, one giant buck.

Hunting Checklist

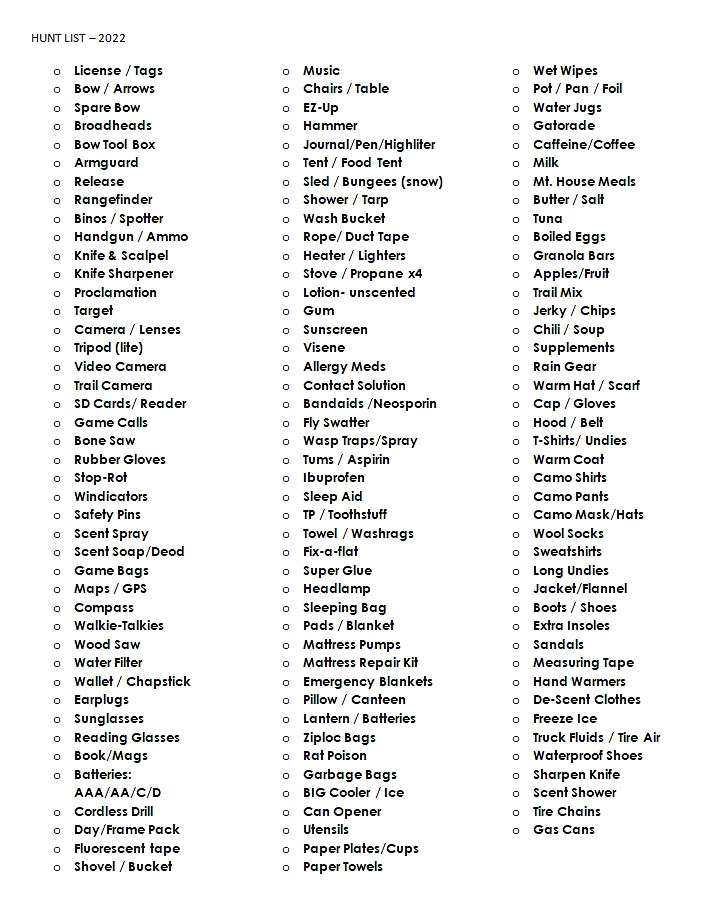
My Hunting/Camping Checklist

I just got back from an impromptu deer scouting trip, and right away I’m inspired to share my personal “hunting checklist.” My wife and I were in a hurry to get out-of-town, so naturally we forgot several things. I won’t make this mistake during my actual hunt, believe me!

Since bowhunting deer is the most important thing I do each year, I’m very thorough in preparation. I’ve been compiling this list for more than twenty years and adding new new items each year.

Note:  Some items don’t apply for short trips, or every trip, but it is very important to have a checklist handy so you don’t forget anything.

Do I miss anything? Let me know.

hunting camping gear equipmentchecklist
Bowhunting and camping checklist


Primitive Weapons Survey 2015

DWR_Survey_2015
DWR Primitive Weapon Survey 2015

Primitive Weapons Survey 2015

I received this survey from the DWR the other day. It asks several questions about using different and newer technologies on bows and guns, such as rangefinders, 50-cal. bullets, bow-scopes, etc. They even asked my opinion on using crossbows during archery season! How is this even being considered? What a joke!

Of course I answered “NO” on every single question. Do you really need a scope and rangefinder attached to your bow? Do you need to hunt deer with a crossbow? If so, maybe you’re a secret gun hunter.

My old adage is gear won’t save you. Forget about the gear and learn about your quarry. For the greatest success, spend more time in the field and less money on equipment

Anyhoo, in the comment section of the survey I wrote:

Modern bow and gun technologies already put the animals at a greater disadvantage. The purpose of hunting is to build sportsmanship and woodcraft, not executing animals at greater and greater distances. Relying on technological advantages not only discourages fair chase, but reduces the number of animals in the field. In the long run it reduces the number of available tags for potential hunters and therefore discourages hunting.

Hopefully the Utah DWR will listen to real sportsmen.