I just got back from an impromptu deer scouting trip, and right away I’m inspired to share my personal “hunting checklist.” My wife and I were in a hurry to get out-of-town, so naturally we forgot several things. I won’t make this mistake during my actual hunt, believe me!
Since bowhunting deer is the most important thing I do each year, I’m very thorough in preparation. I’ve been compiling this list for more than twenty years and adding new new items each year.
Note: Some items don’t apply for short trips, or every trip, but it is very important to have a checklist handy so you don’t forget anything.
I’ve been collaborating with my videographer friend, Shane Thompson, on an awesome archery instructional video. The content for this video is based on lessons I’ve put together and used to teach hundreds of people over the years.
The first instructional video will be out soon and I will post the link here.
Now that spring is here, you’ve probably taken your bow out, dusted it off, and sent some arrows downrange. Maybe some were bulls-eyes while some were errant, but it’s early yet and there’s always room for improvement.
In the last ten years I’ve worked tirelessly at becoming a better hunter. But at the same time, I’ve also developed some bad habits. These habits are common to most archers and include punching the release and lack of follow-through. What you do at the end of your release has the greatest effect on accuracy. So in today’s lesson we’re going to relearn how to shoot.
Bad shooting habits develop because we’re too focused on hitting the bullseye. Everyone knows that humans can only focus on one thing at a time. Ironically, if we focus too hard on the bullseye, we’ll actually miss it!
Here’s the fix
RELAX!: A famous target archer once said, “A relaxed mind cannot exist in a tense body, and a tense mind cannot exist in a relaxed body.” More than anything else, the bow and arrow fights relaxation. First, there’s the mental stress of hitting the bullseye, especially in a hunting or competition. Second, when you draw your bow, your whole body becomes physically tense as it struggles to crank back and hold all that weight. So, now your mind and body are under duress. Your fight and flight response takes over and all that matters in the world is getting rid of that arrow. Now STOP! Tell yourself you will not release until you calm down. Breathe in and out a couple times. Put your sight pin on the bullseye, then take it off, and put it back on again. Who cares if you miss? Refuse to shoot until you are completely calm. Eventually this will become habit and will have the greatest effect on your accuracy.
The Open Grip: By now you probably know how to grip your bow, but it’s worth another look. First, your bow’s grip should begin at U-shape between your thumb and index finger. Second, your grip should contact your hand along your life line (the line that separates the fleshy part of your thumb and middle of your palm. Third, the grip should end at the center of your palm where your wrist begins. If you do this correctly, the middle knuckles of your bow hand will form a 45-degree angle slanted away from your grip. NOW, this is only the beginning. When you draw your bow, your fingers should be relaxed and open away from the bow’s grip. Your fingers should remain relaxed throughout the entire shot. The best way to do this is to make an “okay” sign with your index finger and thumb lightly touching. Your hand must remain like this throughout the entire shot.
Follow-Through: Seems simple, right?! It’s not. Again, you can only focus on one thing, so if you’re still aiming at this point, then you’re not following through. Aiming should go as far as letting the pin float tiny circles around the bullseye. At that point, your only focus should be on pushing the bow forward with your bow arm, and steadily pulling the string back with your release hand. The pin floats almost subconsciously while your focus floats freely and relaxedly between back tension, breathing, and oblivion. Oblivion is where you are free of all anticipation, free of all tension, and free of all distraction. All the technicalities of archery have become one simple action (form) and relegated to your subconscious mind. With nothing left to distract you, you are free; you are in the moment, perfectly centered between the future and the past.
The goal of archery is to relax: relax your grip, relax your body, and relax your mind. At this point, the bow is loosed on its own terms. The bow-and-arrow is accurate every time, subject only to the laws of nature which are fixed. The only variable is the shooter. The greatest obstacle YOU and how you influence the shot. When can master yourself, you will experience perfect archery with every shot.
Note: I’ve included a video in my next blog post that demonstrates the 3 steps to better archery. Here’s the Video Link.
Spring is in the air and that means one thing: archery! It’s time to dust off that old bow and drag your pasty, out-of-shape, winterized carcass outside and do some shooting. Today we’re going to talk about effective range.
What is your “effective range”?
In this post we’ll answer the following questions: At what range are you an effective bowhunter? How do you find out? And why does it matter?
Question #1: What is effective range?
Effective range–or effective distance–is the distance at which you can get all your arrows within a “kill-zone” size area of a target every time.
Question #2: How Do I Figure it Out?
The kill-zone on an average big game animal–like a deer or elk–is a circle 8-10 inches in diameter. This circle encompasses the heart/lungs area known as the vitals. The easiest way to learn your effective range is to shoot four arrows at a paper plate. A standard size paper plate is nine inches, so it makes a perfect kill-zone target. Starting at close range (say 20 yards), shoot four arrows. If all arrows hit within the paper plate, move back ten yards and repeat. Continue doing this until you miss one arrow. WHEN you finally miss a shot, you will know your effective range: It’s the last place you shot where you didn’t miss! So if you miss at 40 yards, then your effective range is 30 yards. At this point, you should begin working on your form and follow-through until you can consistently get every single arrow in the plate at farther distances. Until then, you should never take shots at game over 30 yards.
Question #3: Why is it important?
When you don’t know your effective range, you will end up shooting beyond your abilities and either missing or injuring an animal. This will be a horrible experience for you and the animal, I guarantee it!
Shooting at animals is a lot harder than shooting at a paper plate. There are many psychological factors involved–primarily buck fever–which will cause you to miss. For this reason, you should also practice shooting in adverse conditions such as wind and steep elevation, as well as different body positions like kneeling and crouching–anything that will simulate an actual hunting scenario.
Knowing and sticking to your effective range is the most important first step you should take before going bowhunting. Not only is this a fun exercise, but a valuable measure of your skills. Expanding your effective range will force you to set goals and hone your skills.
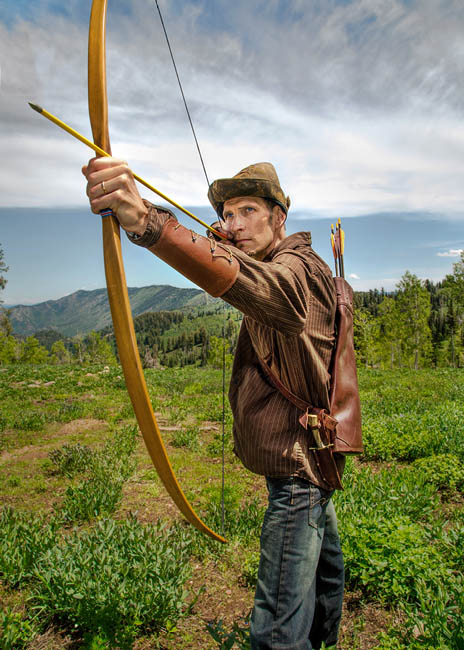
I just had to share this photo taken by Chris Pan at one of my group lessons. The bow I’m shooting is close to 75 years old–it should be in a museum, but then no one could shoot it…
Oh, the all important armguard. With so many exciting archery accessories to choose from, the armguard is often overlooked. In fact some advanced archers don’t even wear one. But for the beginner archer, the armguard is absolutely necessary.
Why? Because it’s just a matter of time before you hit your forearm with the string and break all the blood vessels in a three-inch swathe. It’ll take a couple days for the swelling to go down, but the bruise will linger for a week.
What is an Armguard?
An armguards is a stiff piece of material worn on the inside of your bow arm, somewhere between your elbow and wrist. It should be worn snug enough to not slip around.
Armguards come in all shapes, sizes, and materials and attach around your arm with straps, buckles, Velcro, or string. In ancient times they were fashioned out of leather. Nowadays, it’s mostly stiff plastics, fabric, and cushioned material. You could even fashion one out of duct tape if you were so inclined. What’s important is you have something to protect your arm.
Armguards come in all shapes and sizes.
I prefer the Tarantula 3-Strap Armguard because it’s longer than the two-strap and therefore covers more of my sleeve.
Why Do I Need an Armguard?
The main reason is to protect your forearm and wrist from the bowstring. Perhaps just as importantly, it keeps bulky clothing out of string’s path, something to remember while hunting in cold weather. If the string contacts anything during the shot, the arrow will be thrown way off trajectory.
Another good reason to wear an armguard is to avoid developing target panic. “Target panic” is simply flinching during the shot. A very painful slap will often cause newbie archers to flinch at future shots, thus losing focus on the target. (The goal of archery is to shoot with a “surprise release,” while maintaining focus on the target, not the bow). Consequently, he’ll jerk the string loose instead of releasing smoothly. Releasing the arrow should be the result of your back muscles squeezing together, rather than punching the release or “plucking the string.” A bad case of target panic can take months to cure!
What Causes String Slap?
Hitting your arm with the string is easily avoided by holding the bow correctly. Remember to hold the bow with your elbow bent slightly outward. Don’t lock your elbow inward– a common newbie mistake. At the same time, don’t bend your elbow too much or your arm will fatigue out. A slight bend outward is all you need.
If you still have problems with string slap, it’s likely caused by two other factors:
Short brace height. Brace height is the distance between the bowstring and the bow grip when the bow is at rest. Most bows are somewhere between six and eight inches. If the string is too long for your bow (traditional bows only), then you’ll have a short brace height. Upon release, the bow will pull the string into your wrist. You can easily remedy this by getting a slightly shorter string.
Over-gripping your bow. This happens when you rotate your wrist too far around the bow grip, allowing bow settle in the center of your hand rather than your palm. Remember, the bow should settle at the base of your palm and in-line with your forearm. Over-gripping pulls your wrist into the bowstring’s path.
So much for the basics! I’ve touched on a lot of information here, but in the end just remember to wear an armguard. With enough practice and use of proper form, you won’t even have to wear one.
P.S., of course you can avoid string slap altogether if you aren’t bow hunting! If you are thinking about drawing for any rifle hunts, check out these rifle picks for specific game.
In this short article I’m going to explain the proper way to aim both traditional bows and compound bows.
Aiming Traditional Bows
Traditional bows (recurves and longbows) are aimed in the following sequence of steps:
Nock the arrow onto your string. Grasp the string with three fingers. You can place three fingers beneath the arrow, or two under and one over. Either way is fine, however, placing all three fingers beneath the arrow will bring it closer to your eye and increase accuracy.
Pull the string towards your face so the arrow is directly beneath your right eye (or left eye if you’re left-handed).
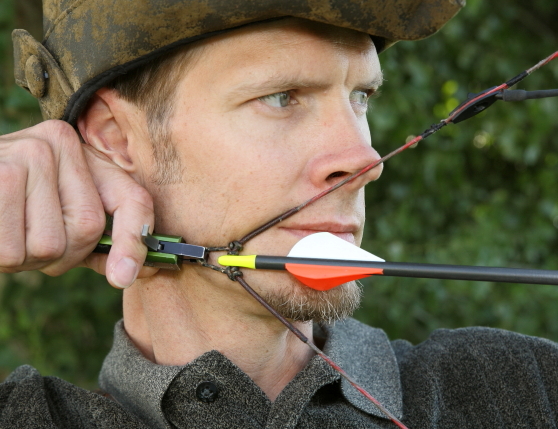
Find your anchor points. Anchor points are spots on your face where your string and hand touches. You must touch the same points with every shot. The best anchor points are a) the string touching the side or tip of your nose, and b) a fingertip (usually the middle finger) touching the corner of your mouth.
Look though the string, or just to the side of it, while aiming down the arrow shaft at the target. Some archers literally look through the string, while others pull the string slightly to the outside of the eye. It’s a matter of personal preference. The important thing is that the string is close to your eye and pulled to the same spot every time.
Point the tip of the arrow at the target and release. Your bow’s draw weight and distance to the target will dictate where the tip of the arrow is in relation to the the target. The farther you get away from the target, the higher you must hold the tip of the arrow to account for the arrow’s arc. The distance at which the arrow tip is on the bull’s-eye is called “point-on.” Point-on is the best reference for aiming. At distances further than point-on, you’ll hold the arrow tip higher. At closer range, hold the tip lower on the bullseye.
The distance at which the arrow tip is on the bulls-eye is called “point-on.”
A different style of aiming is known as intinctive shooting. With instinctive shooting your focus is solely on the target rather than the arrow tip. After dozens and dozens of arrows, you will gradually fall into a natural shooting rhythm in which aiming is unnecessary, similar to throwing a baseball.
Either aiming technique is fine. In time you’ll figure out which works best for you.
Aiming Compound Bows
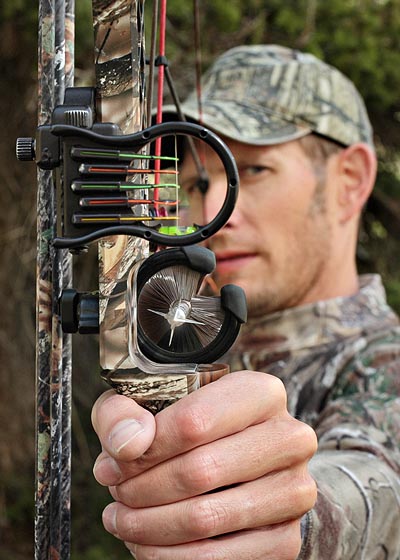
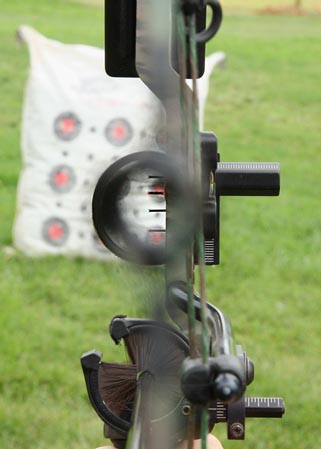
Modern compound bows generally use a round front sight and a round, rear peep sight built into the string. As you draw the string to your aiming eye, the small peep sight becomes a larger, dark, blurry circle approximately the same size as the round sight on the front of your bow. The bow is aimed by bringing the circles together, similar to a rifle scope.
Inside the front sight there are fiber-optic, glowing pins (anywhere from one to seven). The pins are set at measured distances from top to bottom. The top pin is usually set at 20 yards and each lower pin is set at ten yard increments. So at 30 yards you would use the second pin down, at 40 yards you’d use the third pin, and so on.
It’s important to remember that you are aligning the two circles into one circle, and then placing the sight pin on target. Beginner archers sometimes make the mistake of aligning the rear sight with the front pin instead of aligning both sights together (see examples below).
CORRECT sight picture.
INCORRECT sight picture. Align both circles BEFORE placing the pin on target.
Conclusion
For the beginner archer, compound bows can be more difficult to shoot than traditional bows (recurves and longbows) because of all the extra parts. But once you get accustom to the extra step of aligning the two circles, you’ll quickly learn to shoot compound bows just as accurately or more.
All you have to do is align the front and rear sights, put the pin on the bullseye and touch the trigger release (or let go if you’re using your fingers). The bow really does all the work for you.
The basic fundamentals of archery apply to both traditional and modern bows. The main difference is how they are aimed. In my beginner classes I always start my students with traditional bows and work up to modern compounds. After that, it’s up to the student to decide which weapon he/she feels most comfortable with.
Advanced archers make shooting look effortless, but it’s only because they’ve put in countless hours mastering the basics. Over time the many components of form become one single subconscious step that happens in the background of the mind. Here are some key tips for improving your shot.
#1: Keep both eyes open
Keeping both eyes open gives you a better sight picture. This is especially important with traditional bows. Because there aren’t any sights on a traditional bow, your focus is on the target. To acquire a more accurate target, keep both eyes open. I still do this with the compound bow, especially if I’m unsure of the distance.
Keeping both eyes open gives me more dimensionality to the target. Everything I do all day requires me to keep both eyes open, so why would I close one when shooting?
Try shooting with both eyes open.
If you close one eye, you are viewing the world in 2D, not 3D. This is not how your brain sees the world. Because I don’t view the world in two dimensions, I don’t aim in two dimensions either.
#2: Don’t Aim
Proper form begins from the ground up: feet placement, proper grip, and drawing the string to your anchor point. It ends with aiming, releasing, and following through. Of all these steps, aiming is really the easiest and least important.
In traditional archery, aiming is accomplished by simply pointing the arrow at the target. In the time it takes to master the other fundamentals, aiming will become “instinctive.” Therefore, your focus should be on consistent form and follow through, not aiming. If your form is correct, the arrow will find the bull’s-eye on its own.
Note: Correct aiming happens by aligning the string with your eye. This is done by touching the string to the side or tip of your nose. I won’t even loose the arrow until I feel the string on my nose.
#3: Touch your ear
What does your ear have to do with shooting? After each shot, your release hand should brush past your face and end up touching your ear. If you make this a habit, I guarantee your accuracy will improve.
Follow-through means your release hand continues back as your bow arm goes forward. If you allow your release hand to move forward on the shot, or up or down, then the string will be pulled–or plucked–out of alignment, causing the arrow to wobble or drift side to side.
The best way to avoid errant arrows is to follow through straight back. Touching your ear means you’ve released correctly.
Follow through by touching your ear after each shot.
#4: Don’t flinch
Where the bow goes, the arrow goes.
Flinching is a major no-no. The two biggest indicators of flinching are a) dropping or raising your bow arm at the shot, or b) lifting your head to see where the arrow hits.
Neither your head nor your bow arm should move until the arrow hits the target. It’s normal for the bow to rock forward or back on release, but your bow arm should remain up and pointed at the target until the arrow hits. Your head—which is slightly cocked to the side—should also remain in frozen in position as well.
The best way to avoid flinching is to have a surprise release. A common mistake is anticipating the shot by focusing on the release rather than follow-through.
Instead, all your focus should be on form. As you reach your anchor point, the arrow and string will simply pull free as you relax your release hand. If you concentrate the release hand, the string will jerk out of your hand causing the arrow to miss.
#5: Use your back
All the power to draw the bow comes from your back muscles, not your arms. I refer to the arms as “deadposts” or “anchors” because they simply serve to hold the bow. The real power comes from your back muscles.
Your back is much stronger than your arms, and that power is transferred to the bow through your arms. Think of you arms as electric power lines which hang loosely in the air. The lines don’t create the tremendous power that surges through them, the power plant does.
The best way to tap into your back power is to stand up straight and squeeze your shoulder blades together. Upon release, your shoulder blades will continue pulling together—almost touching—while your arms pull the bow apart in opposite directions.
Harnessing the power of your back is the only way to load the bow with enough power to execute the shot properly.
#6: Don’t pinch the string
The most common problem I see in beginner archery is simply keeping the arrow from falling off the bow. At least half my beginner students have a hard time keeping the arrow on the bow long enough to shoot. This is caused by pinching the nock.
Leave a slight gap between your fingers.
The string is gripped with three fingers: index, middle, and ring. As you draw the bow back, the fingers tend to bunch up and put pressure on the nock, which ends up pulling the arrow off the shelf.
To keep this from happening, simply leave a slight gap between your fingers as you draw. If the problem persists, try tilting the bow farther to the side and letting gravity hold the arrow for you.
As frustrating as this might be, the problem usually fixes itself over time.
#7: Loosen your grip on the bow
Frequent left and right misses are caused by torquing, or over-gripping, the bow. I call it the “death grip.” People death-grip the bow because they feel like they need to control the tremendous energy they’ve loaded into to the bow at full draw.
Heavy bows have so much power that we think they might fly back into our face if we don’t grip them tightly. In reality, all that energy simply leaves with the arrow and the bow falls limp in your hand. If you grip too tight, you’ll force the bow left or right. Remember, where the bow goes, the arrow goes.
Use a loose grip on the bow to avoid torque.
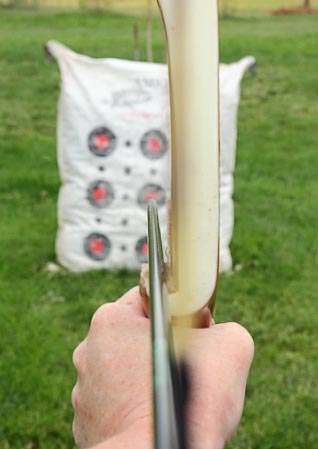
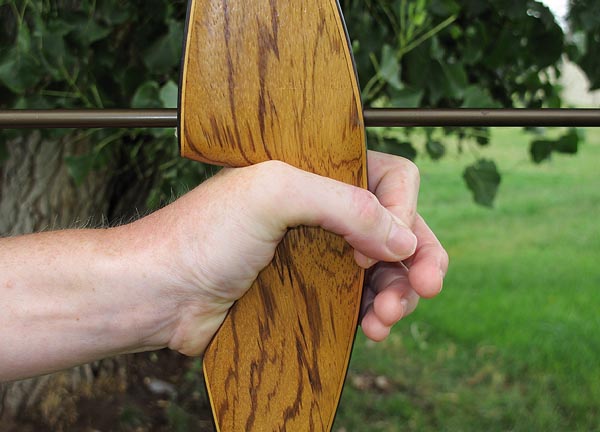
To avoid torque, simply allow the bow sit loosely in your palm while resting your fingertips lightly on the front of the grip. This allows the bow to settle into its natural alignment.
The best way I’ve found to avoid over-gripping the bow is to simply touch your thumb and index finger together and let your other fingers float in front of the bow (see photo).
Conclusion
With enough practice, anyone can master the art of archery. Just remember that hitting the bulls-eye is a long-term goal. Your short-term goal should to master the basic fundamentals. I promise you, hitting the bullseye will come naturally given enough time.
Enjoy the process and don’t get discouraged. If you have any questions at all, please leave a comment.