My bow is my best friend and woods companion. It goes everywhere that I do, sometimes for weeks at a time. It hangs freely from my fingertips, never strapped to my back. It’s tough being my bow, constantly getting banged up and snagging on brush. Sometimes I break parts off of it, but it never complains or fails.
My bow has seen the most amazing things: Trophy bucks beyond imagination, breathtaking sunrises, the glowing Milky Way galaxy on a moonless night. It once protected me from a man-stalking cougar. Another time it was nearly struck by lightning as it hung from my hand during a freak thunderstorm. And yet another day, me and my bow were caught in a freak wind storm that blew down eleven trees into flying splinters around us with nowhere to run.Over the course of a year my bow gets soaked by rain, covered in dirt, and caked with snow. Despite the elements, my bow is 100% accurate with every shot. Whether it’s 100 degrees, or well below zero, my bow always shoots true. When an arrow misses the bullseye I only have myself to blame.
My bow is absolutely quiet, even when it snaps off an arrow at 300 feet per second. A deer might hear the arrow whiz by, but not the whisper of the bows release.
At first glance my bow looks like any other aluminum-framed, modern compound bow. But it’s not. My bow was designed by a certifiable genius-engineer by the name of Mathew McPherson. Since the 1990s, McPherson has led the charge in bow technology, quite literally reinventing the modern compound bow over and over again.
The name stamped on my bow is Halon 32. Halon is a fire-extinguisher gas and a strange name for a bow. Its actual name—the one I gave it—is “Excalibur III”.
Excalibur III is my third serious hunting bow. But in the end it’s still only a tool, and so I usually just call it, well, “My Bow.”
Since 2017 my bow has killed three P&Y deer, one trophy mountain goat, three javelina and several non-trophy animals. It’s the primary provider of meat for me and my family.
Shortly after returning home from a long hunt, I feel an emptiness by my side, like I’m forgetting something. Then I realize it’s my bow, now tucked snuggly away in its case on the floor behind the couch.
Out of sight, but never out of mind, my bow is a warrior and a friend. With my bow, alone, I share life’s greatest moments; my pain, my success, my tears and my glory.
In this short article I’m going to explain the proper way to aim both traditional bows and compound bows.
Aiming Traditional Bows
Traditional bows (recurves and longbows) are aimed in the following sequence of steps:
Nock the arrow onto your string. Grasp the string with three fingers. You can place three fingers beneath the arrow, or two under and one over. Either way is fine, however, placing all three fingers beneath the arrow will bring it closer to your eye and increase accuracy.
Pull the string towards your face so the arrow is directly beneath your right eye (or left eye if you’re left-handed).
Find your anchor points. Anchor points are spots on your face where your string and hand touches. You must touch the same points with every shot. The best anchor points are a) the string touching the side or tip of your nose, and b) a fingertip (usually the middle finger) touching the corner of your mouth.
Look though the string, or just to the side of it, while aiming down the arrow shaft at the target. Some archers literally look through the string, while others pull the string slightly to the outside of the eye. It’s a matter of personal preference. The important thing is that the string is close to your eye and pulled to the same spot every time.
Point the tip of the arrow at the target and release. Your bow’s draw weight and distance to the target will dictate where the tip of the arrow is in relation to the the target. The farther you get away from the target, the higher you must hold the tip of the arrow to account for the arrow’s arc. The distance at which the arrow tip is on the bull’s-eye is called “point-on.” Point-on is the best reference for aiming. At distances further than point-on, you’ll hold the arrow tip higher. At closer range, hold the tip lower on the bullseye.
The distance at which the arrow tip is on the bulls-eye is called “point-on.”
A different style of aiming is known as intinctive shooting. With instinctive shooting your focus is solely on the target rather than the arrow tip. After dozens and dozens of arrows, you will gradually fall into a natural shooting rhythm in which aiming is unnecessary, similar to throwing a baseball.
Either aiming technique is fine. In time you’ll figure out which works best for you.
Aiming Compound Bows
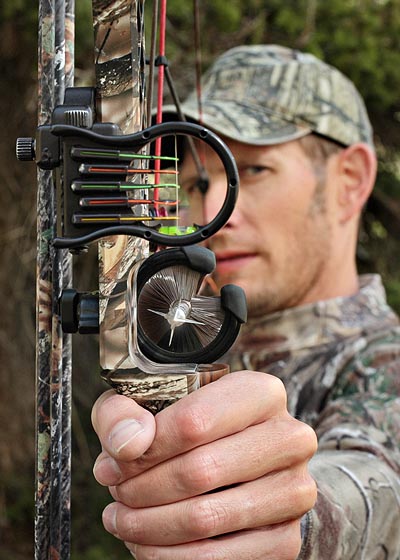
Modern compound bows generally use a round front sight and a round, rear peep sight built into the string. As you draw the string to your aiming eye, the small peep sight becomes a larger, dark, blurry circle approximately the same size as the round sight on the front of your bow. The bow is aimed by bringing the circles together, similar to a rifle scope.
Inside the front sight there are fiber-optic, glowing pins (anywhere from one to seven). The pins are set at measured distances from top to bottom. The top pin is usually set at 20 yards and each lower pin is set at ten yard increments. So at 30 yards you would use the second pin down, at 40 yards you’d use the third pin, and so on.
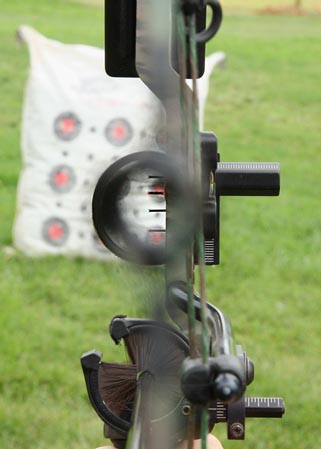
It’s important to remember that you are aligning the two circles into one circle, and then placing the sight pin on target. Beginner archers sometimes make the mistake of aligning the rear sight with the front pin instead of aligning both sights together (see examples below).
CORRECT sight picture.INCORRECT sight picture. Align both circles BEFORE placing the pin on target.
Conclusion
For the beginner archer, compound bows can be more difficult to shoot than traditional bows (recurves and longbows) because of all the extra parts. But once you get accustom to the extra step of aligning the two circles, you’ll quickly learn to shoot compound bows just as accurately or more.
All you have to do is align the front and rear sights, put the pin on the bullseye and touch the trigger release (or let go if you’re using your fingers). The bow really does all the work for you.
The basic fundamentals of archery apply to both traditional and modern bows. The main difference is how they are aimed. In my beginner classes I always start my students with traditional bows and work up to modern compounds. After that, it’s up to the student to decide which weapon he/she feels most comfortable with.
How to Release an Arrow: Traditional Recurve and Compound Bow
In this lesson you will learn how to properly release an arrow.
Nocking an Arrow with Traditional Bows
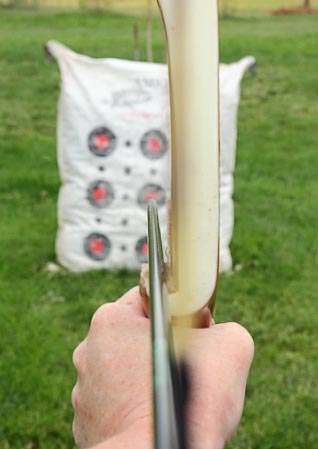
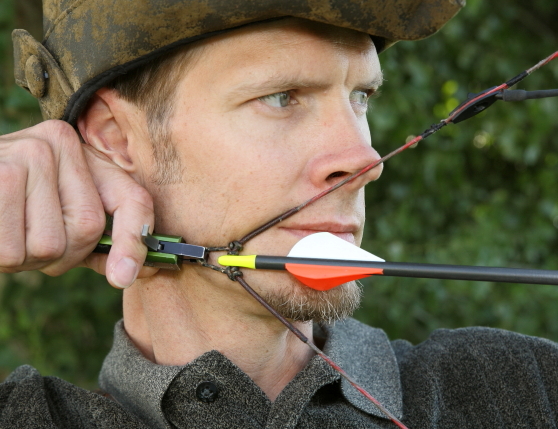
The end of the arrow has a notch in it called an arrow “nock”. The nock attaches to the string just below the “nocking point.” The nocking point is a fixed point on the string that aligns the arrow with the bow for every shot. On most bows, the nocking point is a small brass bead clamped onto the string. The arrow attaches–or nocks–onto the string right below the nocking point. (see photo below)
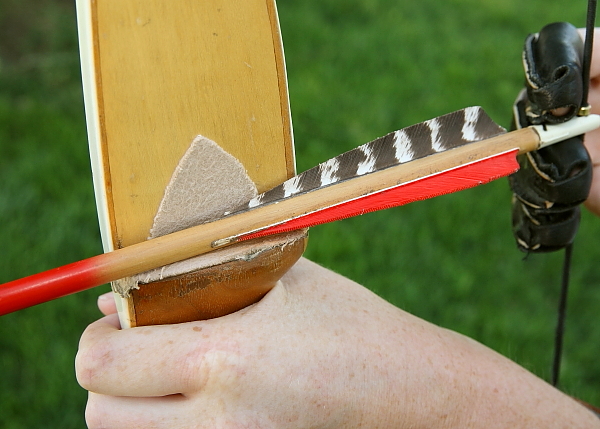
With traditional archery (longbows and recurves), the arrow has three feathers One feather is a different color and is called the “cock” feather. When you nock an arrow, be sure the cock feather always points out, away from the bow. This keeps the feather from deflecting off the bow. (see photo below)
Odd-colored feather always points out.
Nocking an Arrow with Compound Bows
With compound bows, the orientation of the cock “vane” (compound bows have plastic vanes instead of feathers) depends on your arrow rest. The most common arrow rest for compound bows is the drop-away rest. With drop-away rests, the orientation of the cock vane isn’t important as there is no contact with the bow.
With shoot-through, containment style rests like the Whisker Biscuit (as seen below), the cock vane must point upwards. The Whisker Biscuit has stiff bristles on the bottom that support the arrow.
Compound bow with a Whisker Biscuit arrow rest. Notice how the cock vane points upward to avoid contact with the lower stiff bristles.
Anchor Point
The next step is to acquire an “anchor point”. Anchor points are two or more spots on your face where your release hand or string comes in contact with your face. Anchor points are vitally important to consistent shooting and accuracy. Therefore you must establish consistent anchor points from the outset.
Anchor points are different for everyone, but most commonly are:
the string on the tip of your nose
a finger touching the corner of your mouth
side of thumb touching your jaw bone
arrow fletching touching the face
When shooting a compound bow I make sure the string touches the tip of my nose and the side of my thumb touches the back of my jaw.
On traditional bows, the string touches the side of my nose and my first (or middle) finger touches the corner of my mouth.
Compound bow anchor points are: String on nose and thumb at back of jaw bone.Traditional recurves bow anchor points are: String touches die of nose, finger touches corner of my mouth.
Note: Many beginner students are afraid to have string contact with their face. This is totally unwarranted because when you release the arrow, all the energy leaves your face unscathed.
Now we are ready to shoot an arrow!
How to Release the Arrow
Here are the steps to releasing an arrow:
Nock an arrow on the string below the nocking point. You should hear a soft “click” as it locks onto the string. On compound simply attach the mechanical release aid to the D-loop.
Grasp the string with three fingers. Your three fingers will hook onto the string at the first joints of your fingers.
Pull the string across your chest, not towards it, and align the string with your eye. Essentially you should split the target with the string and look down the arrow to aim, but keeping your focus on the target, not the arrow.
Back tension release: As you draw the bow, your back muscles are doing all the work. Squeeze your shoulder blades together as you bring the string to your face. At the same time, you are pushing the bow forward with your bow arm.
Establish your anchor points on your face.
Aim with the point of your arrow while looking through the string at the target. With a compound bow, place the appropriate sight pin on the target.
Release the arrow by simply relaxing and opening your hand. With compound bows you simply touch the trigger of the release.
Follow through. Follow through means that both arms (bow arm and release arm) continue in opposite directions on the shot. This is called “finishing the shot.” Your release hand should continue straight back towards your ear. The last thing you should feel is your release hand brushing past your face and touching your ear. This will reduce oscillation and increase accuracy.
Anchor, release, and follow through.Traditional bow follow-through: Hand brushes face and stops at your ear.
Final Thought
Archery is a complex skill that cannot be mastered in a day, any more than other muscle-memory skills such as golf or skiing. In the movies they make it look easy, and many of my students have the misconception that they can simply pick up a bow and start hitting bullseyes. But without spending a lot of time on the basics, you’ll immediately develop bad habits which will take a long time to break.
Accuracy comes by focusing on each step, one at a time. After many hours–maybe even months–these steps will gradually become one subconscious step called form. Once proper form is established, your only focus will be on aiming. This is should be your goal.
For previous steps on the archery shot sequence, see:

 My bow is my best friend and woods companion. It goes everywhere that I do, sometimes for weeks at a time. It hangs freely from my fingertips, never strapped to my back. It’s tough being my bow, constantly getting banged up and snagging on brush. Sometimes I break parts off of it, but it never complains or fails.
 Over the course of a year my bow gets soaked by rain, covered in dirt, and caked with snow. Despite the elements, my bow is 100% accurate with every shot. Whether it’s 100 degrees, or well below zero, my bow always shoots true. When an arrow misses the bullseye I only have myself to blame.
 The name stamped on my bow is Halon 32. Halon is a fire-extinguisher gas and a strange name for a bow. Its actual name—the one I gave it—is “Excalibur III”.
 Shortly after returning home from a long hunt, I feel an emptiness by my side, like I’m forgetting something. Then I realize it’s my bow, now tucked snuggly away in its case on the floor behind the couch.