Tag Archives: techniques

Secret Bowhunting Tip #1: Weight is Everything

video_Still_003

Bowhunting Tip: Weight is Everything

Be prepared. – Boy Scout Motto

Be prepared, not OVER-prepared. – My Motto

In this article I’m going to address weight issues. No, I’m not talking  about your waiste line. I’m talking about unnecessary items we carry into the field that may be hampering our success.

Utah offers a great opportunity for bowhunters who still have unused archery tags at the end of the general elk and deer seasons. It’s called the Wasatch Extended Archery Hunt. The “extended hunt” runs from the middle of September through the end of December, and encompasses the entire Wasatch Front and the deer rut. I usually see more giant bucks during the extended hunt than the whole general season. The biggest downside to the extended hunt—particularly in November and December—is the steepness of terrain coupled with deep snow and cold weather.

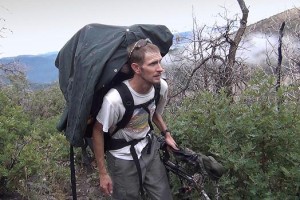
In November of 2012, I hunted the extended hunt for a few days alone. There’s always a little apprehension about venturing into those freezing mountains alone; I really never know where I’ll end up exactly either. To feel more secure on that trip, I brought tons of extra gear, including extra clothing, food, water, hand warmers, boots, and even some reading materials. In other words I over-packed, and that was a big mistake. Instead of taking three hours to drag my sled to camp, it took five hours and I didn’t get to bed until 1:00 am.

For the duration of the trip, my legs cramped, I blew through my water, ate more food than usual, and was forced to rest more frequently. Although it was warmer than previous years, I was more tired and miserable. Miraculously I arrowed a decent buck two days in, but with so much camp weight on top of my deer, I had to leave half my gear on the mountain and return the next day to retrieve it. Not fun!

Extended Hunt Redo

In 2013 I returned to the same spot, only this time I brought my brain. Before the trip I went over the list of junk I hauled up the mountain last year and then crossed out almost half of it. Most of that extra stuff served only to make me feel safer and had no real use for hunting. Some of the items included extra food, water (I could just filter water as I went and /or eat snow), extra boots, a pillow, books, propane, extra knives, hand warmers, utensils, batteries, archery tools, a handgun, extra flashlights, lighters, etc.

I also noticed that my big, leather hunting belt weighed twice as much as my skinny “church belt,” so I wore that one instead.  I even cut the tags off my clothes and the handle off my toothbrush. All in all, I probably removed 30% of my original pack weight, and man did it pay off. I got up the mountain in record time, ate less food, and covered more ground. You might be surprised at how difficult it is to be quiet while wearing a heavy day pack. In the end, I didn’t miss any of the junk I left home. Well, I did miss my handgun when I learned there was an active cougar den with kittens only 300 yards of my tent!

It’s hard to believe that such small items matter so much. It’s the result of the compounding effect. You never know which erroneous item will be the straw that breaks your back.

Weight and Snow Hunting

Weight is especially  a negative factor when hunting in snow. More than anything else, a pair of heavy boots will fatigue you out in the snow. For years I had two boot options: First, a heavy, high-top, insulated cold-weather boot, and second, a lightweight, breathable, un-insulated stalker-style boot. In 20I3 I stopped using heavy boots altogether. What I found was the heavy boots always got too hot due to the extreme terrain. They were also noisy and very heavy compared to my stalker boots.

Now, the stalker boots weigh half as much (similar to tennis shoes),  but there are two minor drawbacks. First, my feet always got cold when I wasn’t moving, and second, they had minimal traction, or tread. To counter the cold, I simply wore two layers of wool socks. As for traction, I simply strapped on a pair of lightweight ice cleats which worked wonders in the snow.

Conclusion

The next time you return from a grueling backcountry bowhunt, I suggest you empty everything in your backpack onto the living room floor and make a list of whatever you didn’t use. Is there still a tag on your tent? Why did you pack it into the woods? Were you going to eat it? Is there half a tube of toothpaste left in your toiletries pocket?  Extra paste is a waste of space.

Weight is everything. That was the lesson I learned in 2013. And surprise, surprise, fear is your worst enemy. Fear is why we over-pack. The more afraid of the mountain we are, the more extra stuff we cram in our packs. And then there’s the great gear paradox:  the more we fear failure, the more hunting gear we tend to carry around in our daypacks.

Bowhunters need to realize that they are the predator, not the gear on your back. You are too be feared, not the mountain. All that extra weight is an anchor keeping you from your goal. Pack light. Don’t be your own worst enemy. Be prepared, not over-prepared.

Click here for my Secret Bowhunting Tip #2:  Success is a Decision

Step #4: Releasing the Arrow

How to Release an Arrow:  Traditional Recurve and Compound Bow

In this lesson you will learn how to properly release an arrow.

Nocking an Arrow with Traditional Bows

The end of the arrow has a notch in it called an arrow “nock”. The nock attaches to the string just below the “nocking point.” The nocking point is a fixed point on the string that aligns the arrow with the bow for every shot. On most bows, the nocking point is a small brass bead clamped onto the string. The arrow attaches–or nocks–onto the string right below the nocking point. (see photo below)

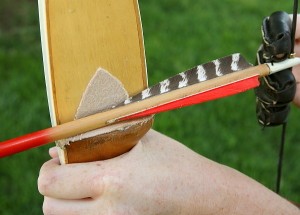
With traditional archery (longbows and recurves), the arrow has three feathers One feather is a different color and is called the “cock” feather. When you nock an arrow, be sure the cock feather always points out, away from the bow. This keeps the feather from deflecting off the bow. (see photo below)

003
Odd-colored feather always points out.

Nocking an Arrow with Compound Bows

With compound bows, the orientation of the cock “vane” (compound bows have plastic vanes instead of feathers) depends on your arrow rest. The most common arrow rest for compound bows is the drop-away rest. With drop-away rests, the orientation of the cock vane isn’t important as there is no contact with the bow.

With shoot-through, containment style rests like the Whisker Biscuit (as seen below), the cock vane must point upwards. The Whisker Biscuit has stiff bristles on the bottom that support the arrow.

031
Compound bow with a Whisker Biscuit arrow rest. Notice how the cock vane points upward to avoid contact with the lower stiff bristles.

Anchor Point

The next step is to acquire an “anchor point”. Anchor points are two or more spots on your face where your release hand or string comes in contact with your face. Anchor points are vitally important to consistent shooting and accuracy. Therefore you must establish consistent anchor points from the outset.

Anchor points are different for everyone, but most commonly are:

  • the string on the tip of your nose
  • a finger touching the corner of your mouth
  • side of thumb touching your jaw bone
  • arrow fletching touching the face

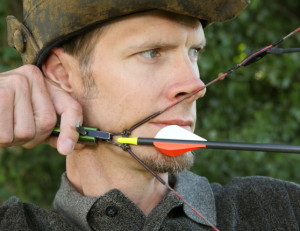
When shooting a compound bow I make sure the string touches the tip of my nose and the side of my thumb touches the back of my jaw.

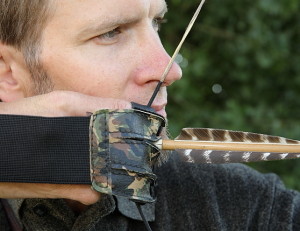
On traditional bows, the string touches the side of my nose and my first (or middle) finger touches the corner of my mouth.


023
Compound bow anchor points are: String on nose and thumb at back of jaw bone.
007
Traditional recurves bow anchor points are: String touches die of nose, finger touches corner of my mouth.

Note: Many beginner students are afraid to have string contact with their face. This is totally unwarranted because when you release the arrow, all the energy leaves your face unscathed.

Now we are ready to shoot an arrow!

How to Release the Arrow

Here are the steps to releasing an arrow:

  1. Nock an arrow on the string below the nocking point. You should hear a soft “click” as it locks onto the string. On compound simply attach the mechanical release aid to the D-loop.
  2. Grasp the string with three fingers. Your three fingers will hook onto the string at the first joints of your fingers.
  3. Pull the string across your chest, not towards it, and align the string with your eye. Essentially you should split the target with the string and look down the arrow to aim, but keeping your focus on the target, not the arrow.
  4. Back tension release: As you draw the bow, your back muscles are doing all the work. Squeeze your shoulder blades together as you bring the string to your face. At the same time, you are pushing the bow forward with your bow arm.
  5. Establish your anchor points on your face.
  6. Aim with the point of your arrow while looking through the string at the target. With a compound bow, place the appropriate sight pin on the target.
  7. Release the arrow by simply relaxing and opening your hand. With compound bows you simply touch the trigger of the release.
  8. Follow through. Follow through means that both arms (bow arm and release arm) continue in opposite directions on the shot. This is called “finishing the shot.” Your release hand should continue straight back towards your ear. The last thing you should feel is your release hand brushing past your face and touching your ear. This will reduce oscillation and increase accuracy.
007
Anchor, release, and follow through.
011
Traditional bow follow-through: Hand brushes face and stops at your ear.

 Final Thought

Archery is a complex skill that cannot be mastered in a day, any more than other muscle-memory skills such as golf or skiing. In the movies they make it look easy, and many of my students have the misconception that they can simply pick up a bow and start hitting bullseyes. But without spending a lot of time on the basics, you’ll immediately develop bad habits which will take a long time to break.

Accuracy comes by focusing on each step, one at a time. After many hours–maybe even months–these steps will gradually become one subconscious step called form. Once proper form is established, your only focus will be on aiming. This is should be your goal.

For previous steps on the archery shot sequence, see:

Step #1: Proper Archery Stance

Step #2: Gripping the Bow

Step #3: The Release

Step #3: The Release Arm

Proper Arrow Release

The release arm, (aka the string arm or shooting arm), is the arm/hand that holds the string while drawing the bow. If you are right handed, then it’s your right hand.

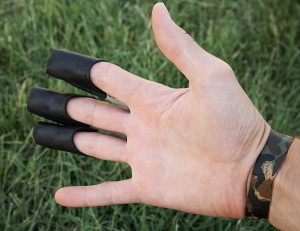
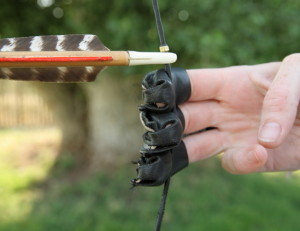
In traditional archery you have the option of wearing a shooting glove or finger tab to protect your shooting fingers (index, middle, and ring finger).

Although it is perfectly fine to shoot with bare fingers on a light-poundage bow, it can be very painful with a heavier-poundage bow. A release “aid” or glove also allows the string to slide off the fingers evenly and with less friction.

IMG_9095
Glove-style release aid.
IMG_9094
Finger tab release aid.

All newer-model compound bows should be shot with a mechanical release aid. Unlike traditional bows (longbows and recurves), compound bows are designed to be shot in-line with the arrow, string, and rest.

With traditional bows, the string naturally oscillates from side to side as it comes off your fingers. This is normal, and the arrow will straighten itself out in flight.

With compound bows, the arrow leaves the bow at a much higher speeds, and therefore, oscillation will cause the arrow to wobble and shed energy as it tries to re-adjust itself in flight. Therefore, the arrow should be shot with perfect alignment to avoid any oscillation.

Compound Bow Release

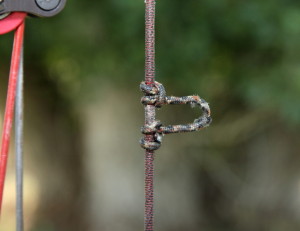
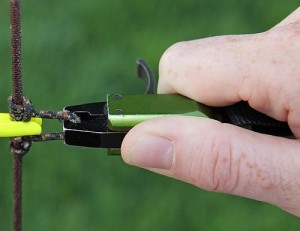
In order to accomplish this, the arrow attaches to the bowstring inside of a D-loop that’s tied to the bowstring. Next, a mechanical release aid attaches to the D-loop to draw the bow back. This keeps the shooters arm aligned perfectly with the arrow.

017
Compound bow D-Loop.
MechRelease
Mechanical release aid for compound bows.

As an aside, my person favorite release is the Fletcher .44 Caliper Release. This is the smoothest, most reliable, and least expensive release I’ve used.

Traditional Archery Release

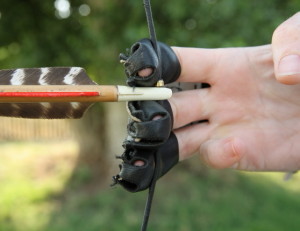
With traditional archery, you have two options for grasping the string: 1) One finger above and two below the arrow nock, or 2) Three fingers below the nock.

The advantage of having three fingers below is that it brings the arrow closer to your eye. This helps with aiming. I’ve personally found that three fingers below dramatically increases my accuracy. Try it both ways and see which method works best for you.

006
One finger above and two below.
Three fingers below. This brings the string closer to your eye.


Click here for the next lesson: Step #4: Releasing an Arrow

Step #2: Gripping the Bow

How to Grip the Bow

The bow arm (or bow hand) is the arm that holds the bow up. It is sometimes referred to as a dead-post because it doesn’t really do anything special, other than hold the bow. That being said, your bow arm has a great effect on accuracy. This applies to both traditional and modern bows.

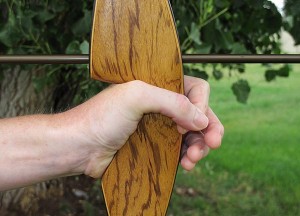
Bow arm grip.

Steps to Properly Grip the Bow

1.  If you are right-handed, grip the bow with your left hand. First off, you’re not really “gripping” the bow, you’re simply holding the bow and pushing it forward as you draw back. If you grip the bow too tightly you’ll torque it from side to side, causing you to miss left or right.

The best way to avoid torque is to lightly touch the tips of your thumb and index finger together and allow your other fingers to remain relaxed.

Use a loose grip on the bow to avoid torque.

2.  The bow’s grip should settle in the “throat” or “V” of your hand (between your thumb and index finger.) The grip should also line up just to the thumb side of your “life line.” In other words, the bow is supported by the big, fleshy part of your lower thumb.

For maximum support, keep your wrist straight and in-line with your forearm bones (as seen in the photo above). If you allow your wrist to bend outward it will cause the bow to settle at the base of your thumb, which causes movement. As you relax your grip on the bow, you will feel the bow settle at a balanced fulcrum point in the throat of your hand.

Correct wrist alignment.
Incorrect wrist alignment.

3. The most common mistake for beginner archers is to allow the elbow to bend downward. This increases the chance of slapping your arm with the string. Therefore, you must draw with your elbow up and bent slightly outward.

Elbow up and bent slightly outward (CORRECT).
Elbow pointed downward (INCORRECT).

4. As you draw the bow back, your bow arm pushes the bow forward. Remember, your back muscles are doing all the work. As you squeeze your shoulder blades together, your bow arm and your shooting arm apply pressure in opposite directions. This is called “pulling the bow apart.”

On the shot, both arms continue in opposite directions. This is called “follow through” and will be covered in a future post.

Click here for Step #3: The Release Arm

Adverse Conditions = Success

Silhouette2

Adverse Conditions = Success

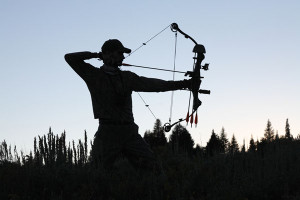
In teaching advanced archery, one of my lessons revolves around “adverse conditions” training. What I mean by adverse conditions is that when you’re shooting arrows in your backyard you are generally shooting at a large target over flat terrain, at a known yardage and in fair weather.

But the inexperienced bowhunter soon realizes that the mountains are very different than practicing at home.

In a real-life hunting scenario you often find yourself shooting from a kneeling position, up or down steep hills, through brush or limbs, at unknown distances, with a fly buzzing around your face and aiming into the sun.

It’s no wonder bowhunters have such low success rates!

In the real world, whether fighting the mountain or fighting the rat race of life, we are constantly battling adverse conditions. Therefore we must practice shooting through adversity in order to become better and stronger at whatever we’re doing.

Adverse Conditions Training

The secret to successful bowhunting is to practice in adverse conditions. This means placing as many mental and physical obstacles between you and the target. The following are some ways to practice for adverse conditions.

Have your shooting partner yell or poke you right before you shoot. Shoot at unknown distances. Shoot with a strong crosswind. Shoot through heavy cover or around obstacles. Do whatever you can do to make practice harder and it will pay off in the woods.

Through many years of real-life hunting experience, I’ve learned that the biggest obstacle is yourself. Even if you shoot 10,000 arrows in the preseason, you’re never really ready when that buck-of-a-lifetime steps out in front of you. When it happens you’ll likely come unglued!

My brother, Russell, relates a story form years ago when he was still new to bowhunting. A small, two-point buck stepped out fifteen years in front of him. Sure enough he panicked and sent his arrow plowing into the dirt at the buck’s feet!

How does one prepare for that kind of pressure? The following are the best ways I’ve found to practice for high-pressure shooting situations:

  1. Don’t shoot square targets. Instead, shoot realistic 3D targets. If you don’t have a 3D target you can always dangle small balloons from a string in front of your target. You might be surprised at how difficult it is to hit a balloon as it dances in the wind. Not only will this prepare you for realistic situations, but it’s a lot of fun.
  2. Compete! At least once or twice a year, sign up for a 3D tournament, even if you aren’t that good. Competitions–especially ones with lots of money on the line–always raise adrenaline levels. If you aren’t up for a formal competition, you can create competitions by practicing with a couple friends. Put a couple bucks on the line and watch the competition soar.
  3. Sprint to and from your target to get your heart rate up, shoot quickly, and repeat. I admit, this isn’t a fun way to practice, but it sure helps.

Remember, overcoming adversity is how we grow stronger in both life and bowhunting. Anticipate adversity–even welcome it–and you’ll be stronger for it.

What are you doing to make practice more challenging?